
 Page Builder
  Widgets Bundle
  SiteOrigin CSS
  Installer
 CSS Snippets
11 min read Updated
CSS snippets change small details that the Vantage settings do not cover. Copy the ones you need. Vantage also keeps 28 of them in its own snippets folder, and they are all on this page.
Where to Add the CSS
Use one of these places:
- SiteOrigin CSS. Go to AppearanceCustom CSS. Vantage recommends this plugin.
- The WordPress Customizer. Go to AppearanceCustomizeAdditional CSS.
- The
style.cssfile of your child theme.
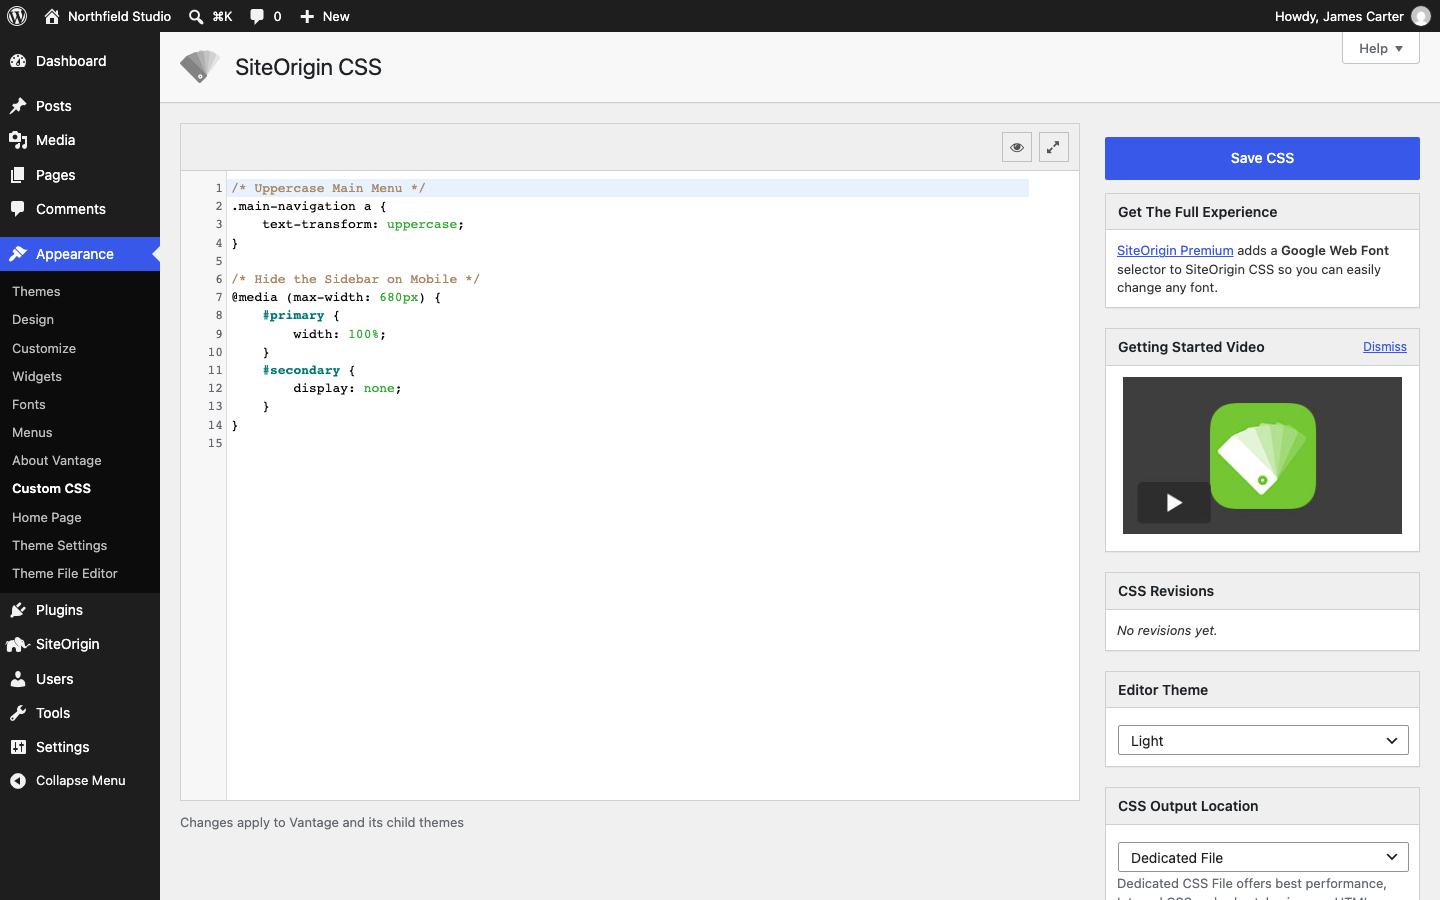
Paste the snippet, change the values to suit your site and save. At the moment, the SiteOrigin CSS Snippets button does not show, so you cannot insert the bundled snippets from the editor. Copy the code from this page instead. We track this on GitHub.
Some snippets use !important to win over the theme styles. Where a snippet says “Adjust”, change the numbers and colors to suit your site.
Contents
Layout and Width
Boxed Layout: Adjust Site Width
Use this with Layout Bound set to Boxed in Layout. Adjust the width to suit your site.
body.responsive #page-wrapper {
    max-width: 1080px;
}
If the sticky menu is on, also add this rule:
body.vantage-sticky-menu.layout-boxed .main-navigation {
    max-width: 1080px;
}
Boxed Layout: Adjust Footer Padding
Adjust the padding of the footer widget area in the Boxed layout.
#colophon {
    padding-top: 30px;
    padding-right: 30px;
    padding-bottom: 30px;
    padding-left: 30px;
}
Boxed Layout: Full Width Header
Make the header and menu full width in the Boxed layout. It works with the default masthead and the Logo In Menu masthead.
body.responsive #page-wrapper {
    max-width: none;
    padding-top: 0;
}
#masthead .full-container,
#main-slider,
#main,
#colophon {
    box-sizing: border-box;
    margin: 0 auto;
    max-width: 1080px;
    padding-bottom: 0;
}
Boxed Layout: Full Width Footer
Make the footer full width in the Boxed layout.
body.responsive #page-wrapper {
    max-width: none;
    padding-top: 0;
}
#masthead,
#main-slider,
#main {
    box-sizing: border-box;
    margin: 0 auto;
    max-width: 1080px;
}
#colophon {
    margin-bottom: 0;
}
Boxed Layout: Remove Bottom Margin
The Boxed layout adds a margin below the footer. This snippet removes it.
#colophon {
    margin-bottom: 0;
}
Boxed Layout: Remove Top Padding
The Boxed layout adds padding above the page. This snippet removes it.
#page-wrapper {
    padding-top: 0;
}
Full Width Layout: Adjust Footer Padding
Use this with Layout Bound set to Full Width.
#colophon {
    padding-top: 30px;
    padding-bottom: 30px;
}
Full Width Layout: Expand Header Content to 100%
Make the header content as wide as the screen in the Full Width layout.
body.responsive.layout-full #page-wrapper .site-header .full-container {
    max-width: 100% !important;
}
Adjust the Site Container Width in the Full Width Layout
.full-container {
    max-width: 1080px !important;
}
Adjust the Header Container Width in the Full Width Layout
.site-header .full-container {
    max-width: 1080px !important;
}
Adjust the Footer Content Container Width
#footer-widgets.full-container {
    max-width: 1080px !important;
}
No Sidebar Content Container Width
Set a maximum width for the content on pages that show no sidebar. That includes pages with no widgets in the Sidebar area, and pages where Page Layout is No Sidebar in Page Settings.
@media (min-width: 1024px) {
    .no-sidebar .entry-content,
    .page-layout-no-sidebar .entry-content {
        margin-right: auto;
        margin-left: auto;
        max-width: 980px;
    }
}
Adjust the Padding Around the Main Content Container
#main {
    padding-top: 35px;
    padding-right: 35px;
    padding-bottom: 35px;
    padding-left: 35px;
}
Remove Main Container Left and Right Padding on a Given Page
Replace 1 with the ID of the page.
.page-id-1 #main {
    padding-right: 0;
    padding-left: 0;
}
Home Page: Remove Content Container Top Padding
Remove the top padding of the content area on the home page. The content area starts after the home page slider.
.home #main {
    padding-top: 0;
}
Hide the Home Page Slider on Mobile
Hide the main slider on small screens. Change 680px to the width where the slider must disappear.
@media (max-width: 680px) {
    #main-slider {
        display: none;
    }
}
Set the Slider Background Color
Set the background color behind the main slider. The color shows only in the Full Width layout when the slider does not stretch.
#main-slider {
    background: #eeeeee;
}
Header and Logo
Style the Header Text
Style the text that you set with Header Text in Logo. Change italic to normal for upright text.
header#masthead .hgroup .support-text {
    color: #4b4b4b;
    font-size: 13px;
    font-style: italic;
}
Disable the Site Title or Logo Link
The site title or logo stops being a link. Use this on a one page website.
#masthead .hgroup a.logo {
    cursor: default;
    pointer-events: none;
}
Logo In Menu: Remove Logo Padding
Use this with the Logo In Menu masthead layout.
header#masthead.masthead-logo-in-menu .logo {
    padding: 0;
}
Logo In Menu: Adjust the Logo Height
Adjust the 33px maximum height to suit your logo.
#masthead.masthead-logo-in-menu .logo > img {
    max-height: 33px;
}
Logo In Menu: Adjust the Site Title Spacing
Use this when Display Site Title Alongside Logo is on.
#masthead.masthead-logo-in-menu .logo > h1,
#masthead.masthead-logo-in-menu .logo > .site-title {
    margin-left: 20px;
    padding-bottom: 7px;
    padding-left: 15px;
    padding-right: 15px;
    padding-top: 7px;
}
Logo In Menu: Transparent Menu
The menu background is transparent until the visitor scrolls. Use this with the Logo In Menu masthead layout and with Sticky Menu set to Menu. The snippet assumes that a slider at the top of each page uses the Page Slider setting. Adjust 53px to the height of your menu.
.main-navigation:not(.sticky) {
    background: transparent;
}
#main-slider {
    margin-top: -53px;
}
Default Masthead: Set the Logo to Full Width and Height
The logo fills the width of the header, and the header text is hidden.
.hgroup {
    max-width: none !important;
    padding: 0 !important;
}
.logo img {
    height: auto !important;
    width: 100%;
}
.logo,
#masthead {
    padding: 0 !important;
}
.support-text {
    display: none !important;
}
Center the Header Widget Area
Use this with the Center Logo setting in General.
body.responsive #masthead .hgroup {
    display: block;
    text-align: center;
}
body.responsive #masthead .hgroup .support-text,
body.responsive #masthead .hgroup #header-sidebar {
    display: block;
    margin-top: 30px;
    max-width: 100%;
    position: static;
}
body.responsive #masthead .hgroup #header-sidebar {
    height: auto;
    padding-bottom: 0 !important;
    padding-top: 0 !important;
}
body.responsive #masthead .hgroup #header-sidebar .widget {
    display: block;
    float: none;
    margin: 0 auto;
}
Adjust the Site Title Font Size on Mobile
@media (max-width: 768px) {
    #masthead.site-header .hgroup .site-title,
    #masthead.site-header.masthead-logo-in-menu .logo > .site-title {
        font-size: 20px !important;
    }
}
Menu
Uppercase Main Menu
.main-navigation a {
    text-transform: uppercase;
}
Expand the Main Menu Drop-Down Width
Stop the drop-down items from breaking onto two lines. The items grow to their full width.
.main-navigation ul ul a {
    white-space: nowrap;
    width: auto;
}
.main-navigation ul ul li {
    min-width: 100%;
}
Set the Drop-Down Menu Opacity
Set the opacity of the drop-down background and of the hovered item. In each value, the first three numbers are the color and the last number is the opacity.
.main-navigation ul ul {
    background: rgba(52, 53, 56, 0.8);
}
.main-navigation ul ul li:hover > a {
    background: rgba(0, 188, 255, 0.8);
}
Menu Drop-Down Item Padding
Set the top and bottom padding of the drop-down items on their own. To set the padding of all menu items, use the padding settings in Menu.
.main-navigation ul ul a {
    padding-top: 10px;
    padding-bottom: 10px;
}
Menu Search Field Opacity
Set the color and opacity of the search field in the main menu.
#search-icon .searchform {
    background: rgba(45, 46, 49, 0.8);
}
Remove the Sticky Menu Box Shadow
The menu has no shadow until it becomes sticky. This snippet removes the shadow.
.main-navigation.sticky {
    -webkit-box-shadow: none;
    -moz-box-shadow: none;
    box-shadow: none;
}
Hide the Mobile Menu Text
Hide the word Menu next to the mobile menu icon.
.mobilenav-main-link-text {
    display: none;
}
Adjust the Mobile Menu Text Font Size
Change the size of the word Menu next to the mobile menu icon. The default is 13 pixels.
.mobilenav-main-link-text {
    font-size: 16px;
}
Keep a Header Menu Widget From Collapsing Into the Mobile Menu
You can put a Navigation Menu widget in the Header widget area. To stop it from collapsing into a mobile menu, use this snippet. Change 480 to the value of Mobile Menu Collapse in Navigation.
@media screen and (max-width: 480px) {
    #header-sidebar .so-mobilenav-standard+* {
        display: block !important;
    }
    #header-sidebar .so-mobilenav-mobile+* {
        display: none !important;
    }
}
Sidebar
Adjust the Sidebar Width
The two widths must add up to 95.049 percent. If you make the sidebar wider, make the content area narrower by the same amount.
#primary {
    width: 71.287%;
}
#secondary {
    width: 23.762%;
}
Hide the Sidebar on Mobile
Hide the sidebar on small screens. Change 680px to the width where the sidebar must disappear.
@media (max-width: 680px) {
    #primary {
        width: 100%;
    }
    #secondary {
        display: none;
    }
}
Add a Sidebar Background Color and Padding
#secondary {
    background: red;
    padding: 20px;
}
Change red and 20px to suit your layout.
Add a Sidebar Border
#secondary {
    border-radius: 6px;
    border: 1px solid #d9d9d9;
    box-sizing: border-box;
    padding: 20px;
}
Add a Border to Each Sidebar Widget
#secondary .widget {
    border: 1px solid #d9d9d9;
    padding: 20px;
    box-sizing: border-box;
    border-radius: 6px;
}
Adjust the Sidebar Widget Title Color
#secondary .widget .widget-title {
    color: #3b3b3b;
}
Content and Text
Remove Link Underlines
Remove the underline from links in the header, the content, the sidebar and the footer.
a {
    text-decoration: none;
}
a:hover {
    text-decoration: none;
}
Table Border Color
By default, Vantage adds one border below each table. This snippet adds a border around the table and around every cell. Change the color to suit your site.
#main table {
    border: 1px solid #2f3033;
}
#main table th,
#main table td {
    border: 1px solid #2f3033;
    padding: 0.5em;
}
Content Container Minimum Height
Set a minimum height for the content area. On pages with little content, the footer then stays lower on the screen. Change 500px to suit your site.
#main {
    min-height: 500px;
}
Change the Body Background Color to White
In the default Full Width layout, the page background and the footer background have the same color. On a page with little content this looks like a large footer. You can make the page background white, or use the snippet above to raise the content area.
body {
    background: #fff;
}
Attempt a Sticky Footer
Keep the footer at the bottom of the screen on short pages. The result depends on your footer height and on the plugins you use, so test it.
@media (min-width: 680px) {
    html,
    body {
        height: 100%;
    }
    #page-wrapper {
        min-height: 100%;
        position: relative;
    }
    #main.site-main {
        padding-bottom: 275px; /* Keeps the footer from covering the content. */
    }
    .site-footer {
        bottom: 0 !important;
        left: 0 !important;
        margin: 0 !important;
        position: absolute !important;
        right: 0 !important;
    }
}
Adjust the Mobile Heading Sizes
Set smaller sizes for the H1 to H6 headings in your content on small screens.
@media (max-width: 768px) {
    .entry-content h1 {
        font-size: 26px;
    }
    .entry-content h2 {
        font-size: 23px;
    }
    .entry-content h3 {
        font-size: 20px;
    }
    .entry-content h4 {
        font-size: 18px;
    }
    .entry-content h5 {
        font-size: 16px;
    }
    .entry-content h6 {
        font-size: 14px;
    }
}
Footer
Footer Widgets With Polylang
You may use Polylang with two languages and add one widget to the footer widget area. The theme then splits the widget area into two columns of 50 percent, because it counts two widgets, and only one widget shows for each language. Use this snippet to fix the width. Versions of Vantage after 1.20.33 count only the widgets that show, so they do not need the snippet.
#footer-widgets .widget {
    width: 100% !important;
}
Change 100% to suit your site. For example, you may have five widgets and only four show for each language. In that case, use this rule:
#footer-widgets .widget {
    width: 25% !important;
}
Horizontal Footer Menu
Put a Custom Menu widget in the footer and show its items in one row. Add the Custom Menu widget first, so that other widgets show below it. Sub-menus do not show.
#footer-widgets .widget.widget_nav_menu {
    text-align: center;
    width: 100%;
}
#footer-widgets .widget.widget_nav_menu li {
    display: inline-block;
    float: none;
    margin-right: 16px;
}
#footer-widgets .widget.widget_nav_menu li a {
    display: inline-block;
    border-bottom: none;
}
#footer-widgets .widget.widget_nav_menu li:before {
    content: "\007C\00a0\00a0";
    margin-right: 16px;
}
#footer-widgets .widget.widget_nav_menu li:first-of-type:before {
    content: none;
    margin-right: 0;
}
#footer-widgets .widget.widget_nav_menu li:last-of-type {
    margin-right: 0;
}
#footer-widgets .widget.widget_nav_menu li .sub-menu {
    display: none;
}
Remove Footer Link Underlines
Remove the underline from links in the footer, in the normal state and on hover.
#colophon a {
    text-decoration: none;
}
#colophon a:hover {
    text-decoration: none;
}
Remove Footer Menu Widget Link Underlines
#colophon .widget_nav_menu .menu-item a {
    border-bottom: none;
}
Adjust the Footer Font Family
#footer-widgets {
    font-family: "Helvetica Neue", Helvetica, Arial, "Lucida Grande", sans-serif;
}
Adjust the Footer Widget Title Font Size
#footer-widgets .widget .widget-title {
    font-size: 14px;
}
Adjust the Footer Widget Content Font Size
#footer-widgets .widget .widget-title ~ * {
    font-size: 13px;
}
Adjust the Bottom Bar Font Size
The bottom bar holds the Site Information Text.
#footer-widgets ~ div {
    font-size: 12px !important;
}
Widgets
Center the Footer Vantage Social Media Widget
Center the Vantage Social Media Widget in the footer. It must be the only widget in the footer widget area. The snippet does not change the SiteOrigin Social Media Buttons Widget.
.widget_vantage-social-media {
    justify-content: center;
}
Circle Icon Widget: Hide the More Link
Hide the More link of the Vantage Circle Icon Widget.
.widget_circleicon-widget .circle-icon-box a.more-button {
    display: none;
}