
 Page Builder
  Widgets Bundle
  SiteOrigin CSS
  Installer
 Adding Custom CSS
8 min read Updated
Your theme uses CSS, the code behind your site’s colors, fonts, spacing and layout. Custom CSS is a set of rules you add on top of your theme’s CSS to change part of the design, such as the color of your buttons or the size of your site title. Many support replies, including ours, answer a design question with a few lines of CSS.
We recommend the free SiteOrigin CSS plugin for custom CSS: it gives you a CSS editor and visual controls, and it works with any theme. WordPress also has its own Additional CSS field for site-wide CSS. A classic theme puts it in the Customizer, and a block theme puts it under Styles in the Site Editor. Each block also has an Additional CSS field in its Advanced settings, for CSS that applies to that one block. Wherever you add it, your CSS stays separate from your theme’s files, so a theme update won’t erase it.
Add CSS With SiteOrigin CSS
SiteOrigin CSS adds a CSS editor to your dashboard, and its Visual Mode shows your site beside your changes.
- Go to PluginsAdd Plugin and search for SiteOrigin CSS.
- Install and activate the plugin. See Installing a Plugin if you need help.
- Go to AppearanceCustom CSS.
- Type or paste your CSS into the editor.
- Click Save CSS.
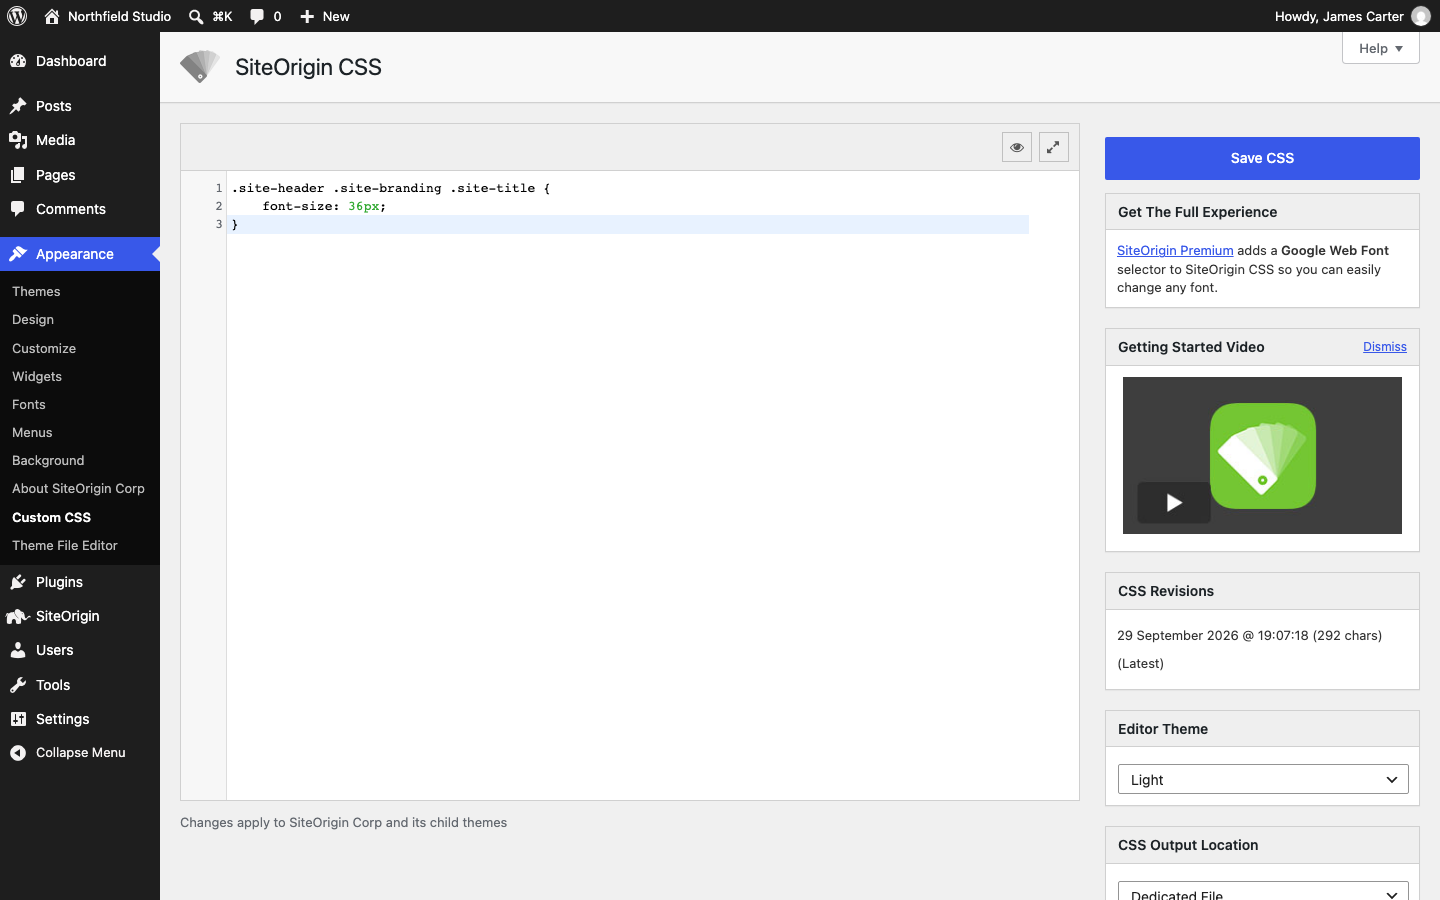
If you’d rather not write CSS, click the eye icon (Open Visual Mode), then click the part of the page you want to change. Set its colors, fonts and spacing in the Text, Decoration and Layout sections, and SiteOrigin CSS writes the rule for you. SiteOrigin CSS saves your CSS for the active theme, and its child themes use it too. The CSS Revisions section keeps earlier versions you can go back to. Getting Started with SiteOrigin CSS covers the rest.
Use WordPress’s Additional CSS Field
If you’d rather not add a plugin, use WordPress’s Additional CSS field. Classic themes put it in the Customizer, and block themes put it under Styles in the Site Editor. To check which kind of theme you have, open the Appearance menu: a block theme has an Editor item there.
In the Customizer (Classic Themes)
Classic themes, including SiteOrigin Corp and Vantage, use the Customizer. It shows a live preview, so you see each change before visitors do.
- Go to AppearanceCustomize and click Additional CSS.
- Type or paste your CSS into the CSS code field and check the preview.
- Click Publish.
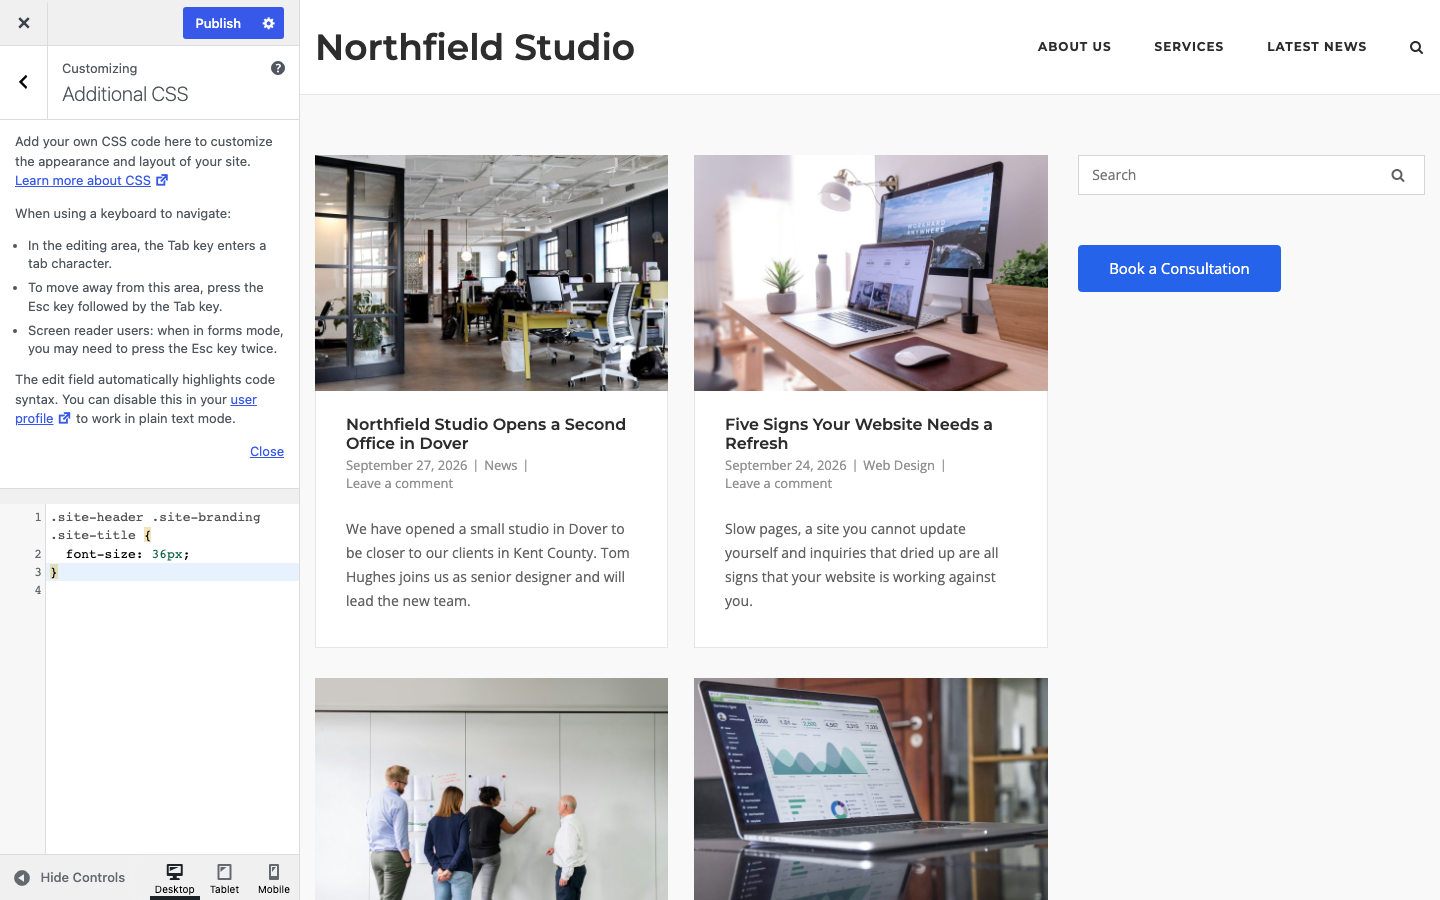
In SiteOrigin Corp, for example, this rule makes the site title larger. If your theme uses a different class for the site title, Find the Right Selector shows how to find it.
.site-header .site-branding .site-title {
	font-size: 36px;
}
If your CSS has a mistake, such as a missing bracket, the Customizer marks the line and blocks Publish until you fix it. Leave the Update anyway, even though it might break your site? checkbox disabled, because a missing bracket stops every rule after it from working.
In the Site Editor (Block Themes)
In a block theme, such as Twenty Twenty-Five, Additional CSS is under Styles.
- Go to AppearanceEditor and click Styles.
- At the top of the Styles panel, click the More menu (three dots) and choose Additional CSS.
- Type or paste your CSS into the Additional CSS field.
- Click Save. If a panel opens with a list of changes, click Save there too.
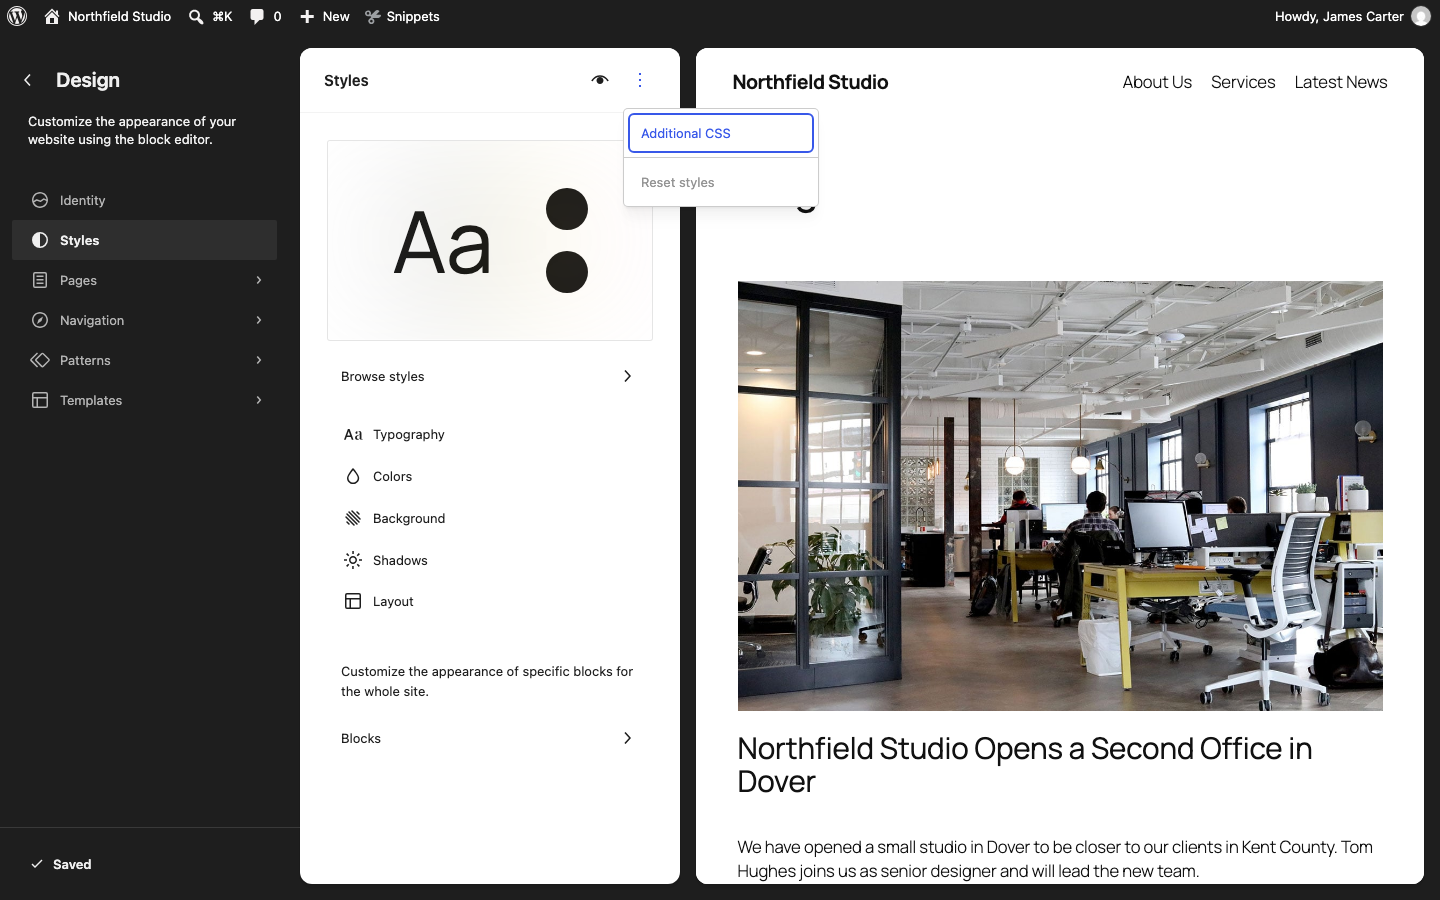
To style every block of one type, open Blocks in Styles. Choose the block type, such as Button, and open Advanced. Enter border-radius: 0; on its own, with no selector, to give Button blocks square corners by default. A button with its own corner setting keeps it.
Add CSS to a Single Block
When only one block needs a change, you can give it CSS of its own in a post, page or Site Editor template.
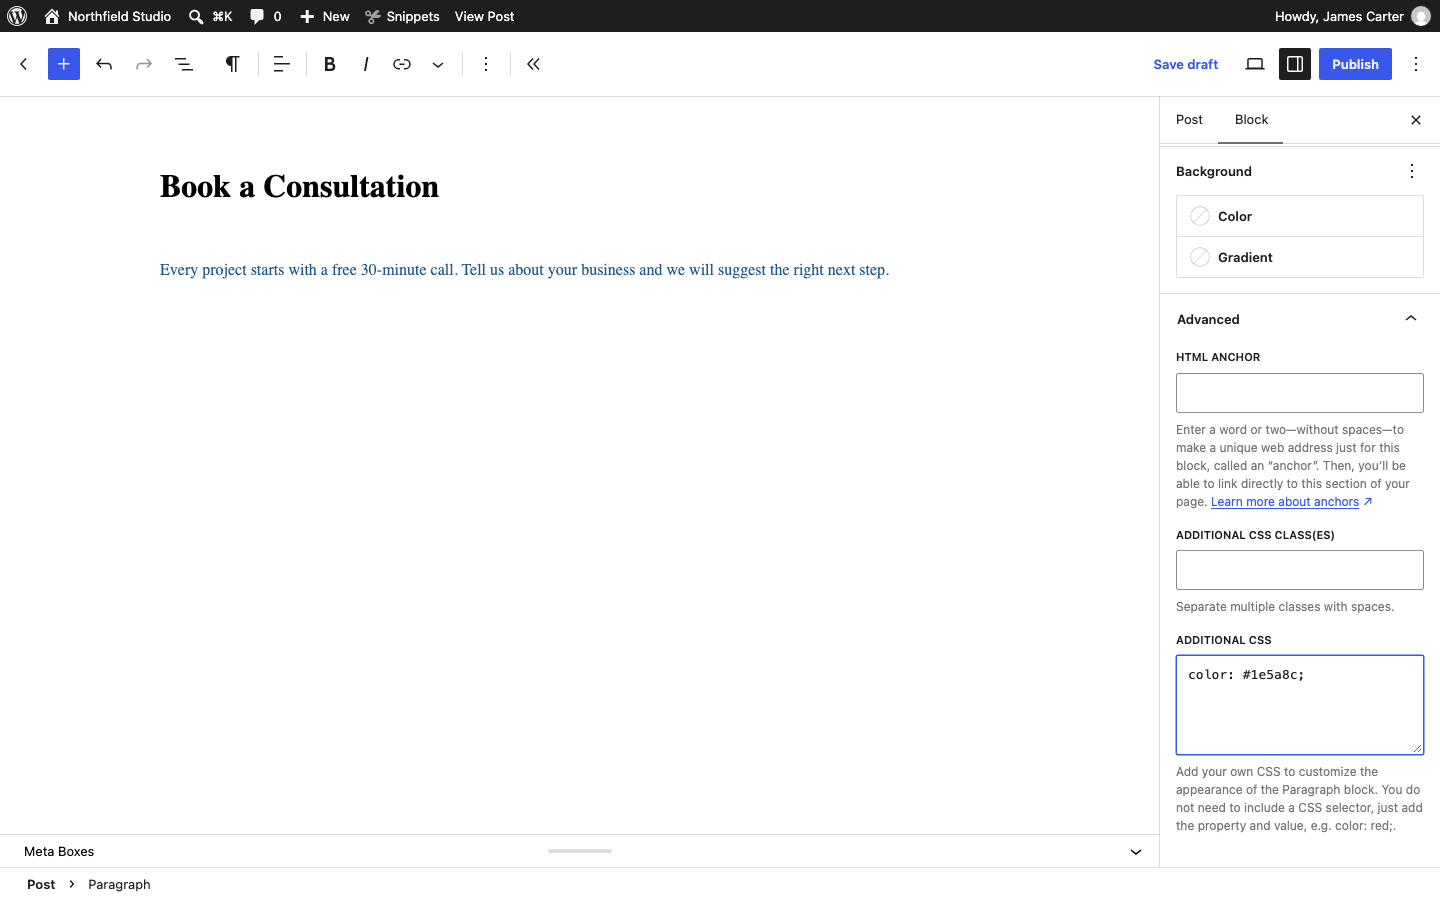
- Select the block.
- In the block settings sidebar, open Advanced.
- Type the properties into Additional CSS, for example
color: #1e5a8c;. WordPress applies it to the selected block only. A few blocks, such as Custom HTML and Shortcode, have no Additional CSS field. - Save the post, page or template.
Page Builder by SiteOrigin also lets you add CSS to a row, column or widget. In the row or widget settings, open Attributes and enter a declaration such as color: #1e5a8c; in CSS Declarations. Leave out the selector and braces. To style a column, open the row’s settings and click the column in the row preview. Styling Rows, Columns and Widgets covers the other style settings.
Find the Right Selector
A CSS rule starts with a selector, which tells the browser what to style. In .site-title { font-size: 36px; }, the selector is .site-title. Themes name their parts differently, so a snippet written for one theme does nothing in a theme that uses other names. Your browser’s Inspect tool shows the HTML and CSS of any part of a page and lets you try a change before you save it.
- Open your site in Chrome, Edge or Firefox.
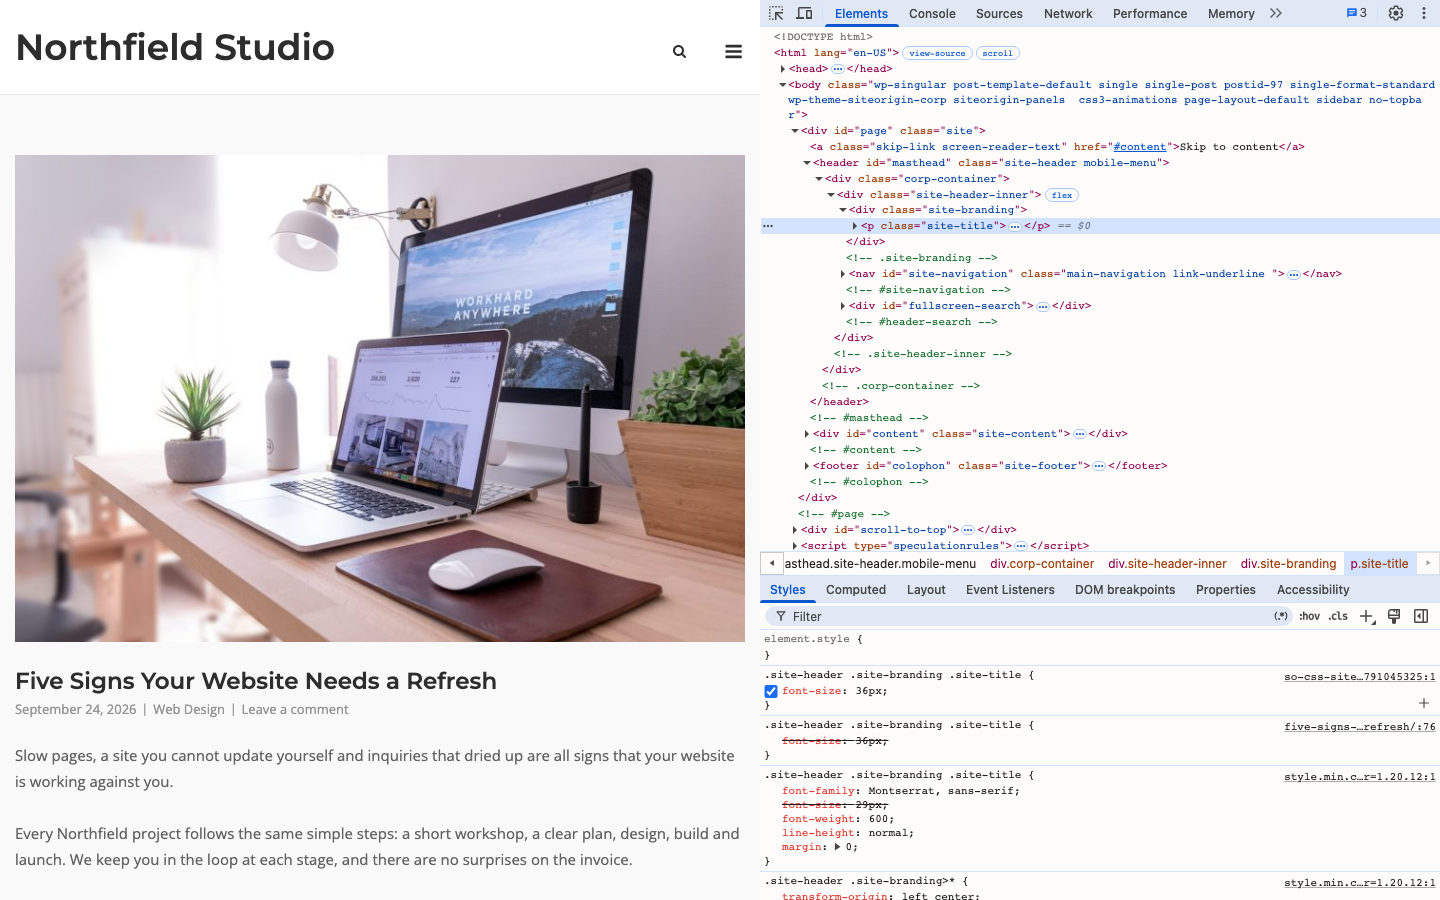
- Right-click the part you want to change and choose Inspect. A panel opens with the page’s HTML, with the line for that part highlighted.
- Look for a
class="..."orid="..."value on that line, or on the line around it if it has neither. - The Styles pane (Rules in Firefox) lists the CSS for that part, with the selector above each rule.
- Click a value in the pane and change it to preview the result on the page. Nothing is saved, and a reload removes it.
- When it looks right, copy the selector shown above the rule you changed and write a rule with your new value, such as
.site-header .site-branding .site-title { font-size: 36px; }in SiteOrigin Corp. - Paste the rule into SiteOrigin CSS or Additional CSS and save it.
- Check the page.
In Safari, first enable Show features for web developers in Safari > Settings > Advanced, then right-click the page and choose Inspect Element.
If your saved rule has no effect, inspect the part again and find your rule in the Styles pane. A crossed-out line means another rule overrides it. Compare the winning rule’s selector with yours, and make your selector at least as specific, for example by copying the winning selector. Then check the page again.
To change one page only, put that page’s class in front of the selector. In the Inspect panel, find the body line near the top of the HTML. Look for a class like page-id-42 on a page, or postid-42 on a post; your number will differ. Put a period before the class and place it in front of the full selector you tested:
.page-id-42 .site-header .site-branding .site-title {
	font-size: 48px;
}
If Additional CSS Is Missing or Empty
If you can’t find Additional CSS, or its field is empty, check these causes:
- You switched themes. WordPress saves Additional CSS with each theme, including child themes, so your old rules stay with the previous theme. To copy them without changing what visitors see, go to AppearanceThemes and click Live Preview on the old theme. Open Additional CSS and copy the rules. Close the old theme’s preview and paste the rules into your current theme’s Additional CSS. Check the preview before you publish, because a rule only works if the new theme uses the same selectors.
- Your theme is a block theme. Block themes keep Additional CSS in Styles in the Site Editor, and WordPress shows no Customize item under Appearance for a block theme unless a plugin or the theme adds Customizer settings. If a plugin restores Customize, the Customizer’s Additional CSS section still works. If both are available, add new rules in the Site Editor’s Additional CSS, and check the Customizer for rules you added there earlier.
- Your account can’t edit CSS. By default, only Administrators can use Additional CSS in the Customizer and the Site Editor. On a multisite network, only Super Admins can. If an Administrator can’t see it either, ask your host or developer whether CSS editing is turned off in
wp-config.php.
If your CSS is saved but the page doesn’t change, clear your caches first. Clearing Caches When Changes Don’t Show explains how to clear each cache.
Where Not to Put CSS
Don’t add CSS to your theme’s own style.css file or to a plugin’s files. An update replaces those files, and your changes are lost.
If you use a child theme, you can also put your CSS in its style.css; a parent theme update won’t erase it.
Ask Your AI Assistant
Your AI assistant can suggest a CSS rule when you describe the change and share the HTML of the part you want to change. Paste its rule into SiteOrigin CSS or Additional CSS, check the preview, and save it only if the change looks right. Before you paste HTML, remove email addresses, customer details and anything else private.
To copy the HTML, right-click the highlighted line in the Inspect panel and choose Copy > Copy outerHTML. In Firefox, choose Copy > Outer HTML. Then copy this prompt and replace the words in capitals:
Write CSS for a WordPress site. I will paste it into my CSS editor.
My theme: THEME NAME.
What I want to change: DESCRIBE THE CHANGE, FOR EXAMPLE "MAKE THIS
BUTTON DARK BLUE WITH WHITE TEXT".
Where it applies: EVERY PAGE, OR ONLY THE PAGE WITH THIS BODY CLASS:
PASTE THE PAGE-ID OR POSTID CLASS.
This is the HTML of the element, copied from the browser inspector:
PASTE THE HTML HERE.
Choose a selector from this HTML. If it doesn't identify the
element, tell me what else to copy. Write one short rule without
!important and explain what each line does.