
 Page Builder
  Widgets Bundle
  SiteOrigin CSS
  Installer
 Image Sizes and Blurry Images
5 min read Updated
When you upload a photo, WordPress keeps the original and makes smaller copies of it, each at a set size. Pages load faster when your site shows a smaller copy, but if that copy is smaller than the space it fills, the browser stretches it and it looks blurry. The fix is to choose a larger size, and if even the largest one isn’t sharp, to upload a larger original.
The Sizes WordPress Makes
Three of the sizes are set at SettingsMedia:
- Thumbnail size: 150 × 150 pixels. By default, WordPress crops a large enough image to that exact square. Disable Crop thumbnail to exact dimensions (normally thumbnails are proportional) to keep the image’s shape.
- Medium size: up to 300 × 300 pixels, with the image’s proportions kept.
- Large size: up to 1024 × 1024 pixels, with the proportions kept.
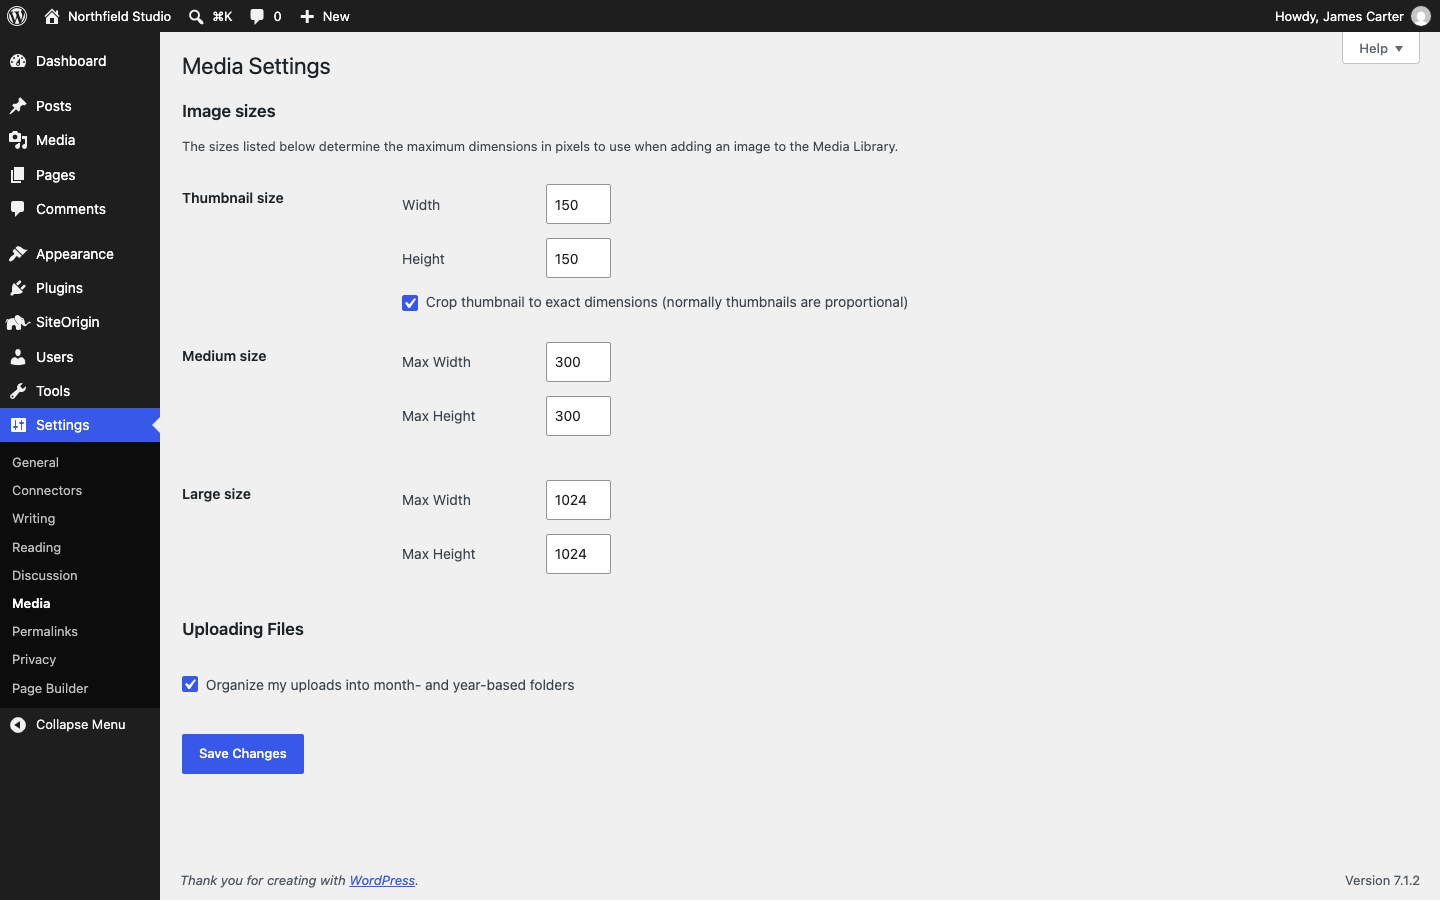
WordPress also makes larger copies for high-resolution screens, which this screen doesn’t list, and browsers choose among all the copies when a page loads. Themes and plugins add sizes of their own too, for example for blog cards or shop products. Full Size is the original upload, unless it’s over 2,560 pixels and WordPress scales it down.
WordPress never makes a copy larger than the original. A photo 600 × 400 pixels is too small for WordPress to make a Large copy.
A change at SettingsMedia applies only to images you upload afterward. To update your older images, regenerate their sizes.
Large Uploads Are Scaled to 2560 Pixels
When an upload is wider or taller than 2560 pixels, WordPress scales it down to fit within 2560 × 2560 pixels and uses that copy as Full Size. It adds -scaled to the copy’s file name, for example harbor-scaled.jpg. WordPress keeps the original too. To view it, open the image in the Media Library and click the link next to Original image:.
If you resize photos before you upload them, make them about twice as wide as they appear on the page. A photo shown 900 pixels wide needs a file about 1800 pixels wide to look sharp on high-resolution screens.
Why an Image Looks Blurry
An image looks blurry for one of these reasons:
- The copy is too small for the space. If the file is 300 pixels wide but fills a 900-pixel column, the browser stretches it to three times its size. Choose a larger size.
- The original is too small. If a photo 600 pixels wide fills a 1200-pixel header, no setting makes it sharp. Upload a wider original and replace the image.
- The screen has a high resolution. When an image has too few pixels for a high-resolution screen, such as a phone’s, logos and text inside it look blurry even where they look sharp on other screens. For logos, see Uploading Your Logo.
- A size changed after you uploaded the image. If a size gets larger, images you uploaded earlier keep their old, smaller copy until you regenerate them. When you switch themes, older images lack the sizes the new theme uses, so WordPress falls back to another size, with the wrong shape or a larger file than the page needs. Regenerate the sizes.
To see which copy a page uses, right-click the image and open it in a new tab. A file name that ends in a size, such as harbor-300x200.jpg, is a 300 × 200 copy. To check the size of Full Size, click the image in MediaLibrary. If the file is narrower than the space it fills, choose a larger size. If Full Size is still blurry, upload a larger original.
Choose the Size in the Block Editor
The Image block inserts the Large copy, or Full Size when the image is too small to have one. To choose another copy:
- Select the Image block.
- In the block settings sidebar, find Resolution.
- Choose a larger size. If Large looks blurry, choose Full Size.
- Save the post or page.
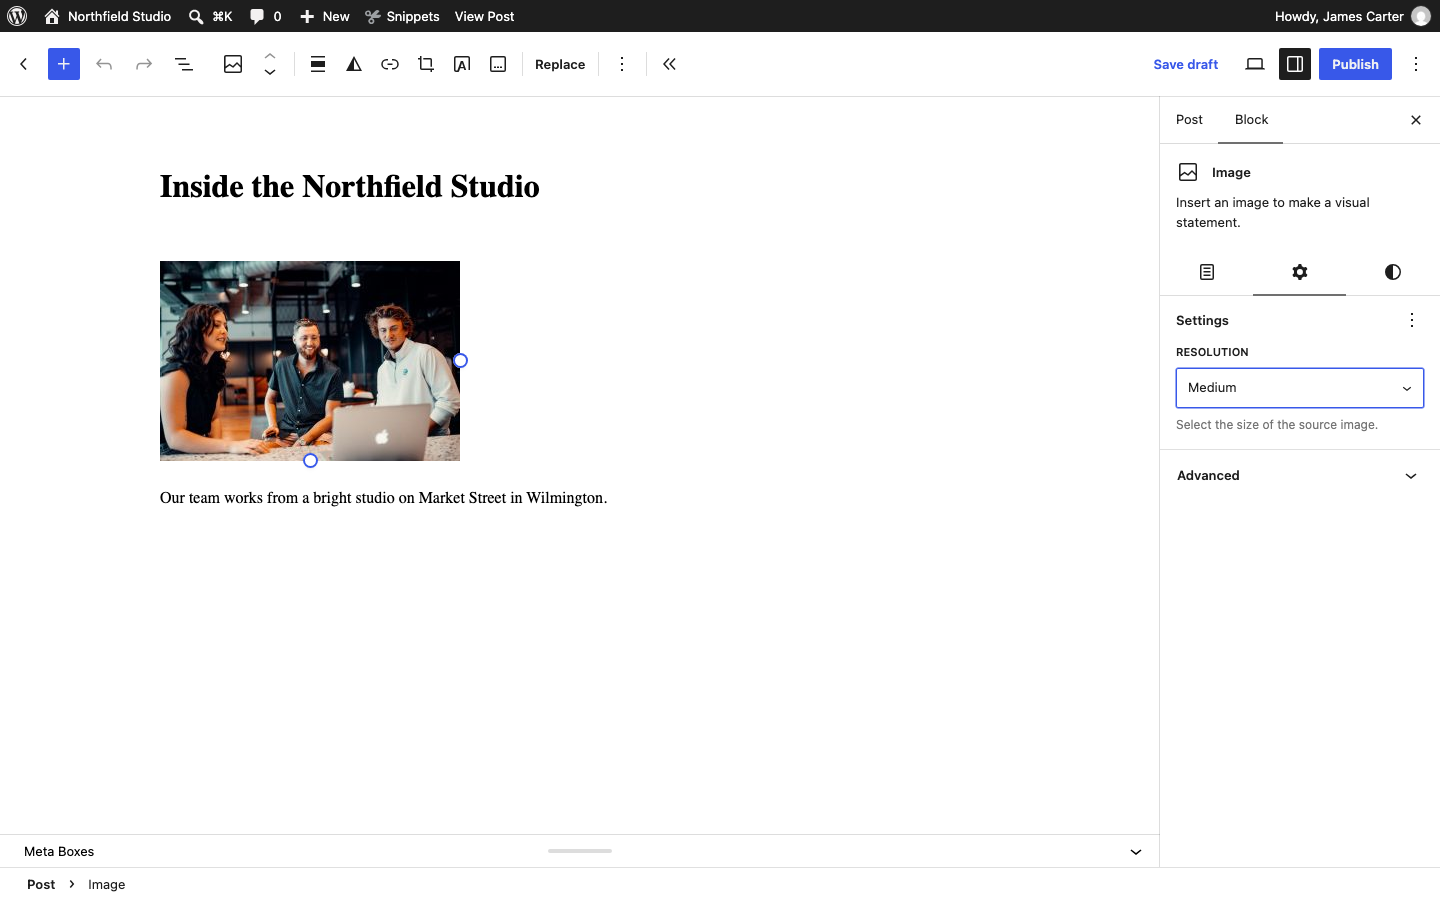
Resolution sets the copy WordPress inserts, and on a high-resolution screen the browser loads a larger copy when one exists. To change how large the image appears on the page, drag the handles at its edges.
The Gallery block has one Resolution setting for all its images. If you edit templates in the Site Editor, the Featured Image block there has a Resolution setting too.
Choose the Size in the Classic Editor
- Click Add Media and select the image.
- Under Attachment Display Settings, choose a Size. Each choice shows its width and height in pixels.
- Click Insert into post or Insert into page.
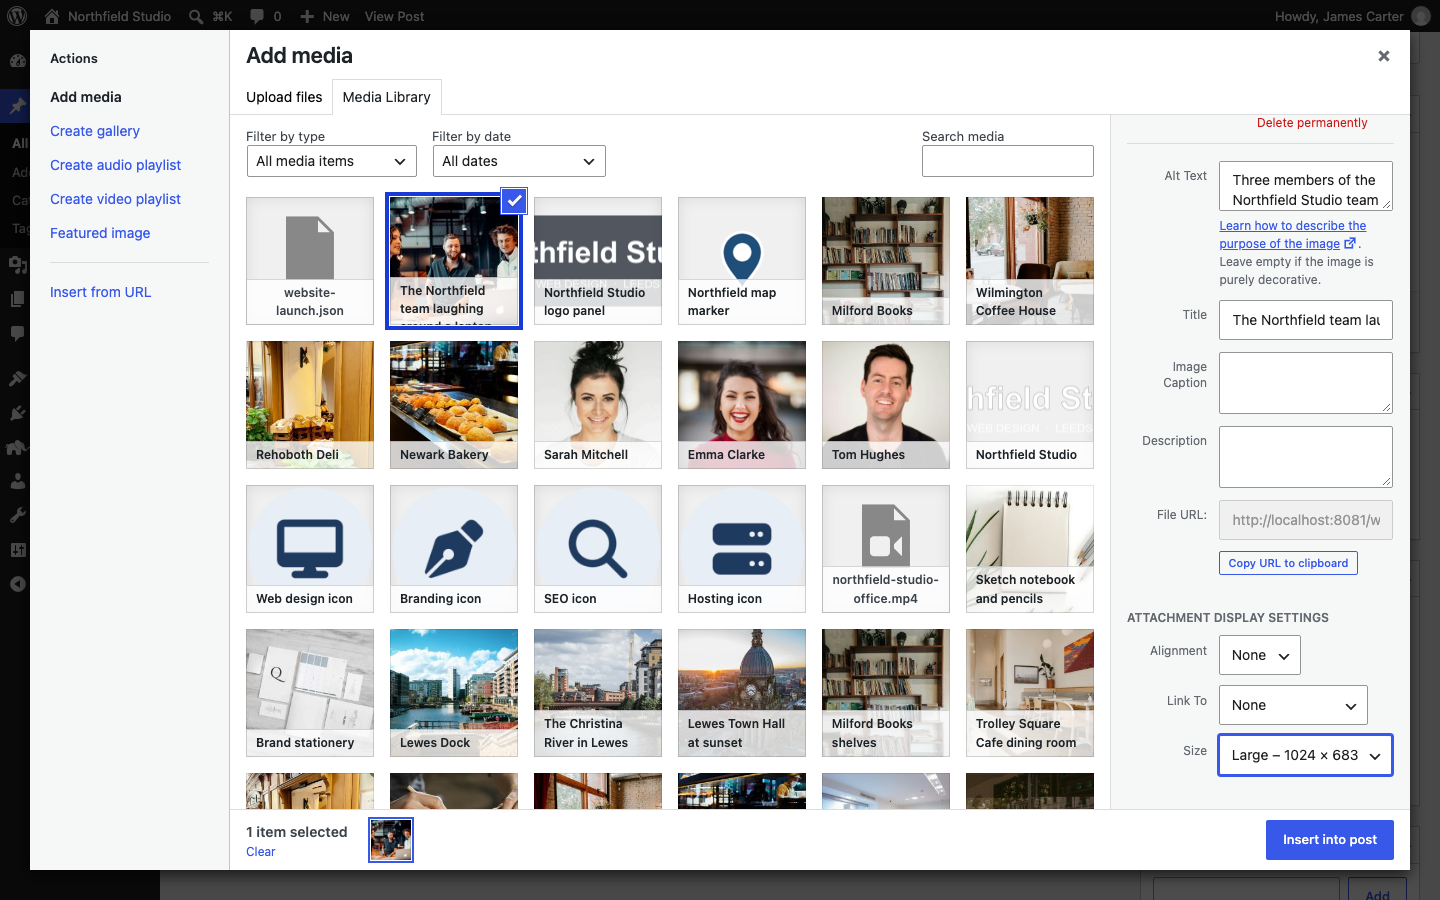
To change an image you already inserted, click it, then click the pencil icon. Choose a new Size under Display Settings.
Choose the Size in Widgets
In the SiteOrigin Widgets Bundle, the Image Widget has an Image size setting. The Blog Widget and Post Carousel Widget have Featured Image Size. Check the widget on a phone, and choose a larger size if the image looks blurry.
Regenerate Sizes for Existing Images
Switching themes or changing a size leaves the copies of older images as they are. The free reGenerate Thumbnails Advanced plugin creates the missing copies, and it replaces the existing copies when you ask it to. Back up your site before you start.
- Install and activate reGenerate Thumbnails Advanced, as described in Installing a Plugin.
- Go to ToolsRegenerate Thumbnails.
- Under Regenerate these thumbnails:, four standard WordPress sizes are checked. Check your theme’s sizes too, or click Select All to regenerate every size.
- If you changed a size’s dimensions, enable Force regeneration next to it. Without it, the plugin skips images that already have a file for that size.
- Click Save Settings, then click Regenerate. Keep the tab open until it finishes.
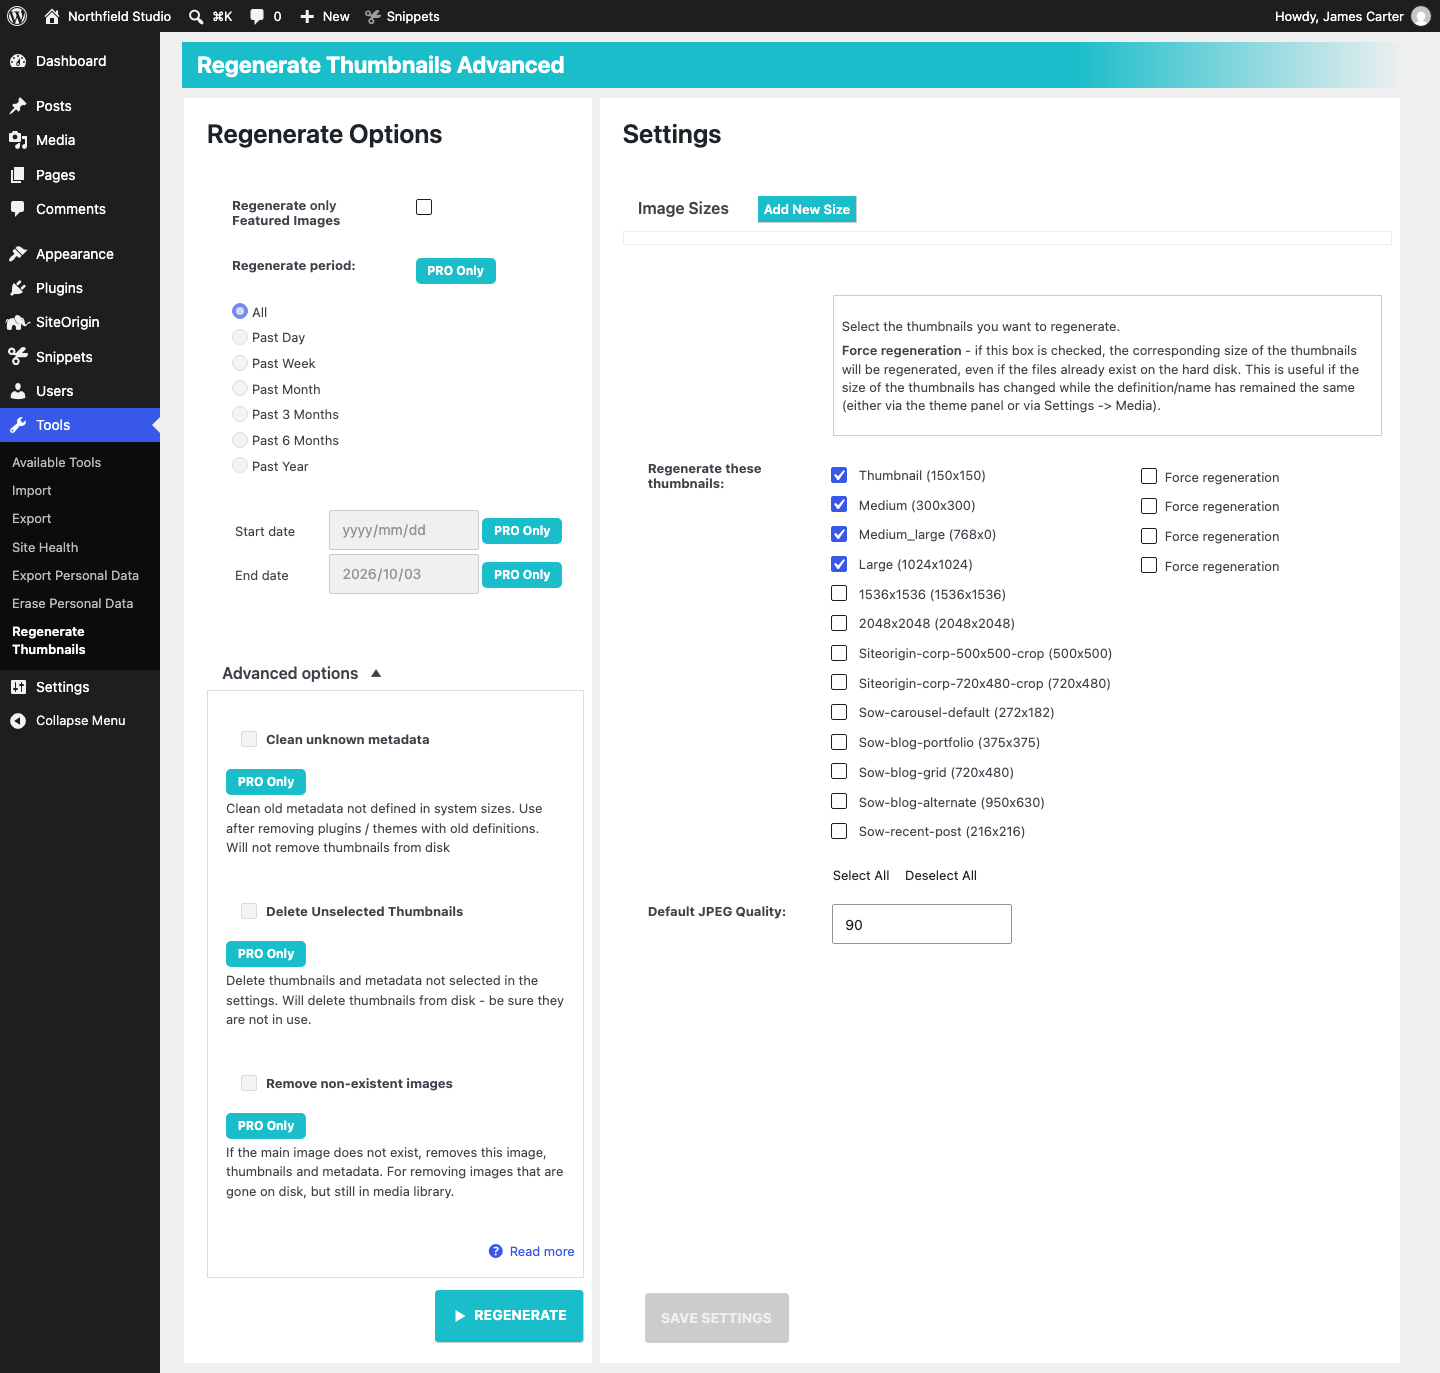
Leave Delete Unselected Thumbnails under Advanced options unchecked. If a post still uses one of the copies it deletes, that post is left with a broken image.
Images already in your posts keep the copy they were inserted with. If one still looks blurry after you regenerate, edit the post, select the image and choose its size again.