
 Page Builder
  Widgets Bundle
  SiteOrigin CSS
  Installer
 Moving Your Site to a New Host or Domain
9 min read Updated
A WordPress site has two parts: its files and its database. The files hold WordPress itself, your themes and plugins, and everything you’ve uploaded, and the database holds your content and settings. To change hosts, you copy both parts and point WordPress to the new database. To change domains, you also replace the old address stored in the database. The steps below are for a single WordPress site; if you run a multisite network, follow the multisite steps in Moving WordPress on WordPress.org instead.
Page Builder layouts, widget settings and Customizer settings are stored as serialized data. This format records the length of each text value, including each URL. A plain find and replace changes the URL and leaves the old length in place, and WordPress then can’t read the setting. A migration plugin, or a search-and-replace tool that handles serialized data, updates the lengths for you.
Before You Move
- Make a full backup of your site’s files and database, and download a copy. Backing Up and Restoring Your Site shows how.
- Go to ToolsSite Health, open the Info tab and expand Server to find your PHP version. Tell your new host which version you use, and ask which version the moved site will run on.
- Ask your new host if they’ll move the site for you, and what it costs.
- If you’re keeping your domain, ask the new host how to preview the moved site before you point the domain to them.
Move with a Migration Plugin
All-in-One WP Migration and Backup exports your database, themes, plugins and uploads to one file. When you import the file into a new WordPress install, the plugin replaces the old address everywhere it appears, including in serialized data.
- On the old site, install and activate the plugin.
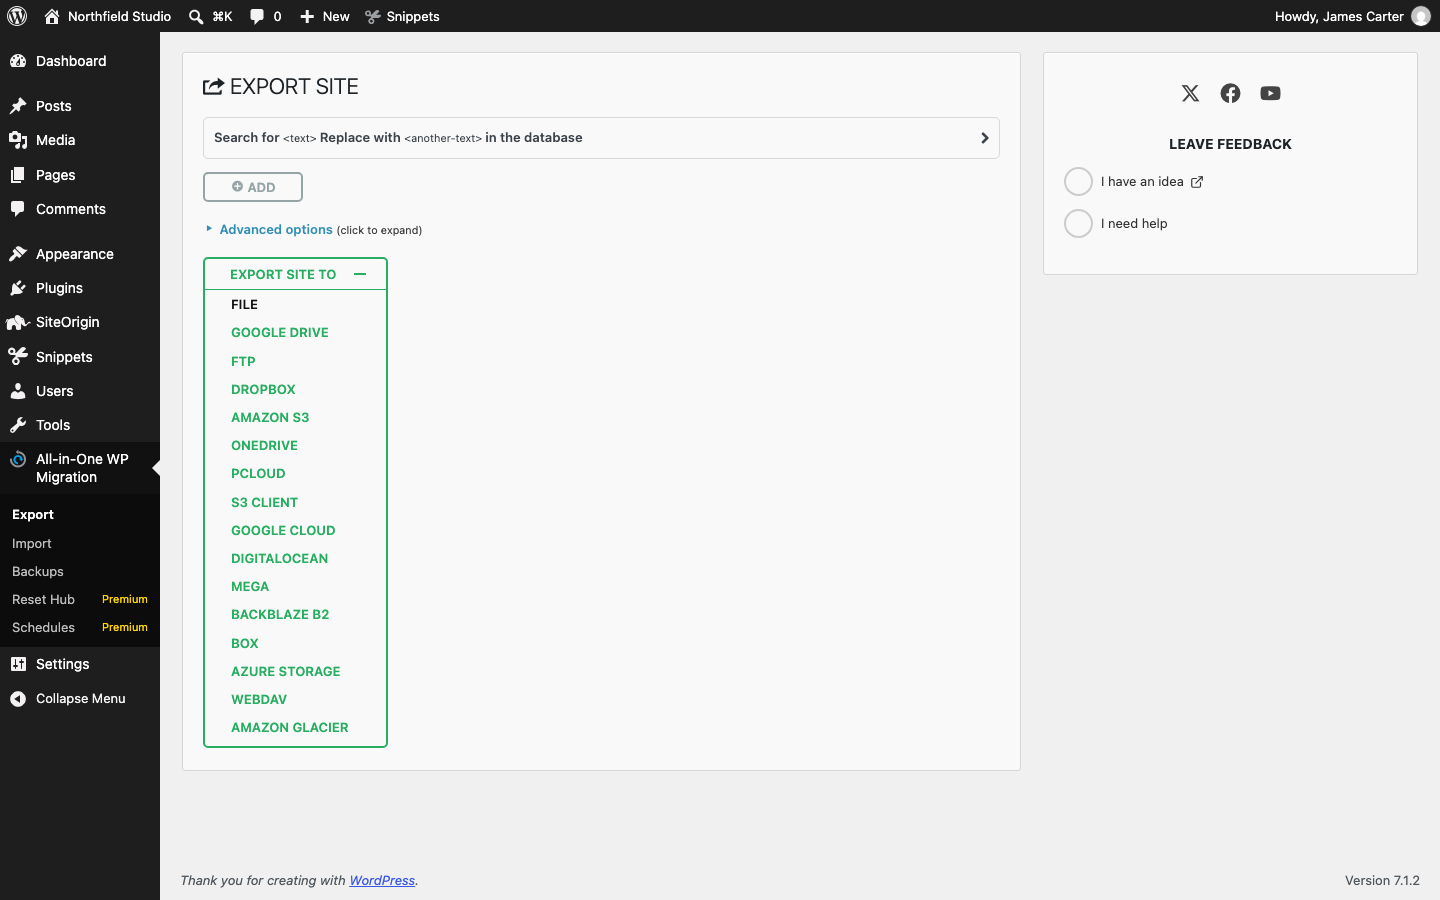
- Go to All-in-One WP MigrationExport, open Export Site To and choose File.
- When the export finishes, download the file to your computer.
- On the new host, install WordPress, then install the same plugin.
- Go to All-in-One WP MigrationImport, open Import From and choose File.
- Select the file you downloaded.
- The import replaces the new site’s database, themes, plugins and uploads. Click Proceed to confirm, and Finish when it is done.
- Log in with your old site’s username and password, because the import copied the old site’s users along with its content.
The Import screen shows your host’s upload limit, and a larger file won’t import. If your file is larger, ask your host to raise the limit. If they can’t, move the site with the installer from Duplicator, or follow the manual steps below.
Move the Site by Hand
For a manual move, you copy the WordPress files with your Hosting File Manager and move the database with your host’s database tool.
- On the old host, log in to your hosting account and open the File Manager.
- Open the folder WordPress is installed in, such as
public_html. - Select the WordPress files and folders, including hidden files such as
.htaccess, and compress them into a zip file. - Download the zip file.
- Export the database with your host’s database tool, such as phpMyAdmin. Choose the SQL format.
- On the new host, create an empty database and a database user with full rights to it.
- Import the SQL file into the new database with the database tool.
- In the new host’s File Manager, upload the zip file to the folder that matches where WordPress was on the old host, such as
public_html, and extract it there. Keep any subfolder the old site used. If extracting created an extra folder that wasn’t on the old site, move the files out of it. - Open
wp-config.phpin the File Manager and enter the new database name, username, password and host.
Find these four settings in wp-config.php:
define( 'DB_NAME', 'new_database_name' );
define( 'DB_USER', 'new_database_user' );
define( 'DB_PASSWORD', 'new_database_password' );
define( 'DB_HOST', 'localhost' );
Your new host gives you the value for DB_HOST; for example localhost. Leave the $table_prefix line as it is. You copied it with the old site’s files, so it already matches the table names in the database you imported.
If your host has no File Manager, extract the zip file on your computer, update wp-config.php with the new database details, then upload the files with SFTP. Ask your host for the SFTP server address, username and password, then upload the files with a client such as FileZilla or Cyberduck.
If you’re keeping the domain, ask your new host which DNS records to change. Once the domain points to the new host, make the checks in After the Move. If you’re changing domains, point the new domain to the new host, then replace the old address in the database before you test the site. Once the new site works, keep the old domain active and ask its host to redirect each old page address to its new address. Old links then keep working while search engines update their results.
Change the Address to a New Domain
After a manual move to a new domain, the database still contains the old address. Replace it with a tool that handles serialized data. Never edit the SQL file in a text editor to replace the address: that breaks Page Builder layouts, widgets and Customizer settings.
If the new site sends you to the old address when you try to log in, add these two lines to wp-config.php, above the line that reads /* That's all, stop editing! Happy publishing. */. Replace the example address with your new one.
define( 'WP_HOME', 'https://www.example.com' );
define( 'WP_SITEURL', 'https://www.example.com' );
WP_HOME is the address visitors use, and WP_SITEURL is the address of WordPress’s own files. When WordPress is installed at the address visitors use, they are the same. Set WP_SITEURL to where WordPress lives on the new host, including any subfolder, and WP_HOME to the address visitors use. After you replace the addresses in the database, remove the two lines so WordPress uses the saved values.
Better Search Replace does the replacement from your dashboard:
- Install and activate the plugin.
- Go to ToolsBetter Search Replace.
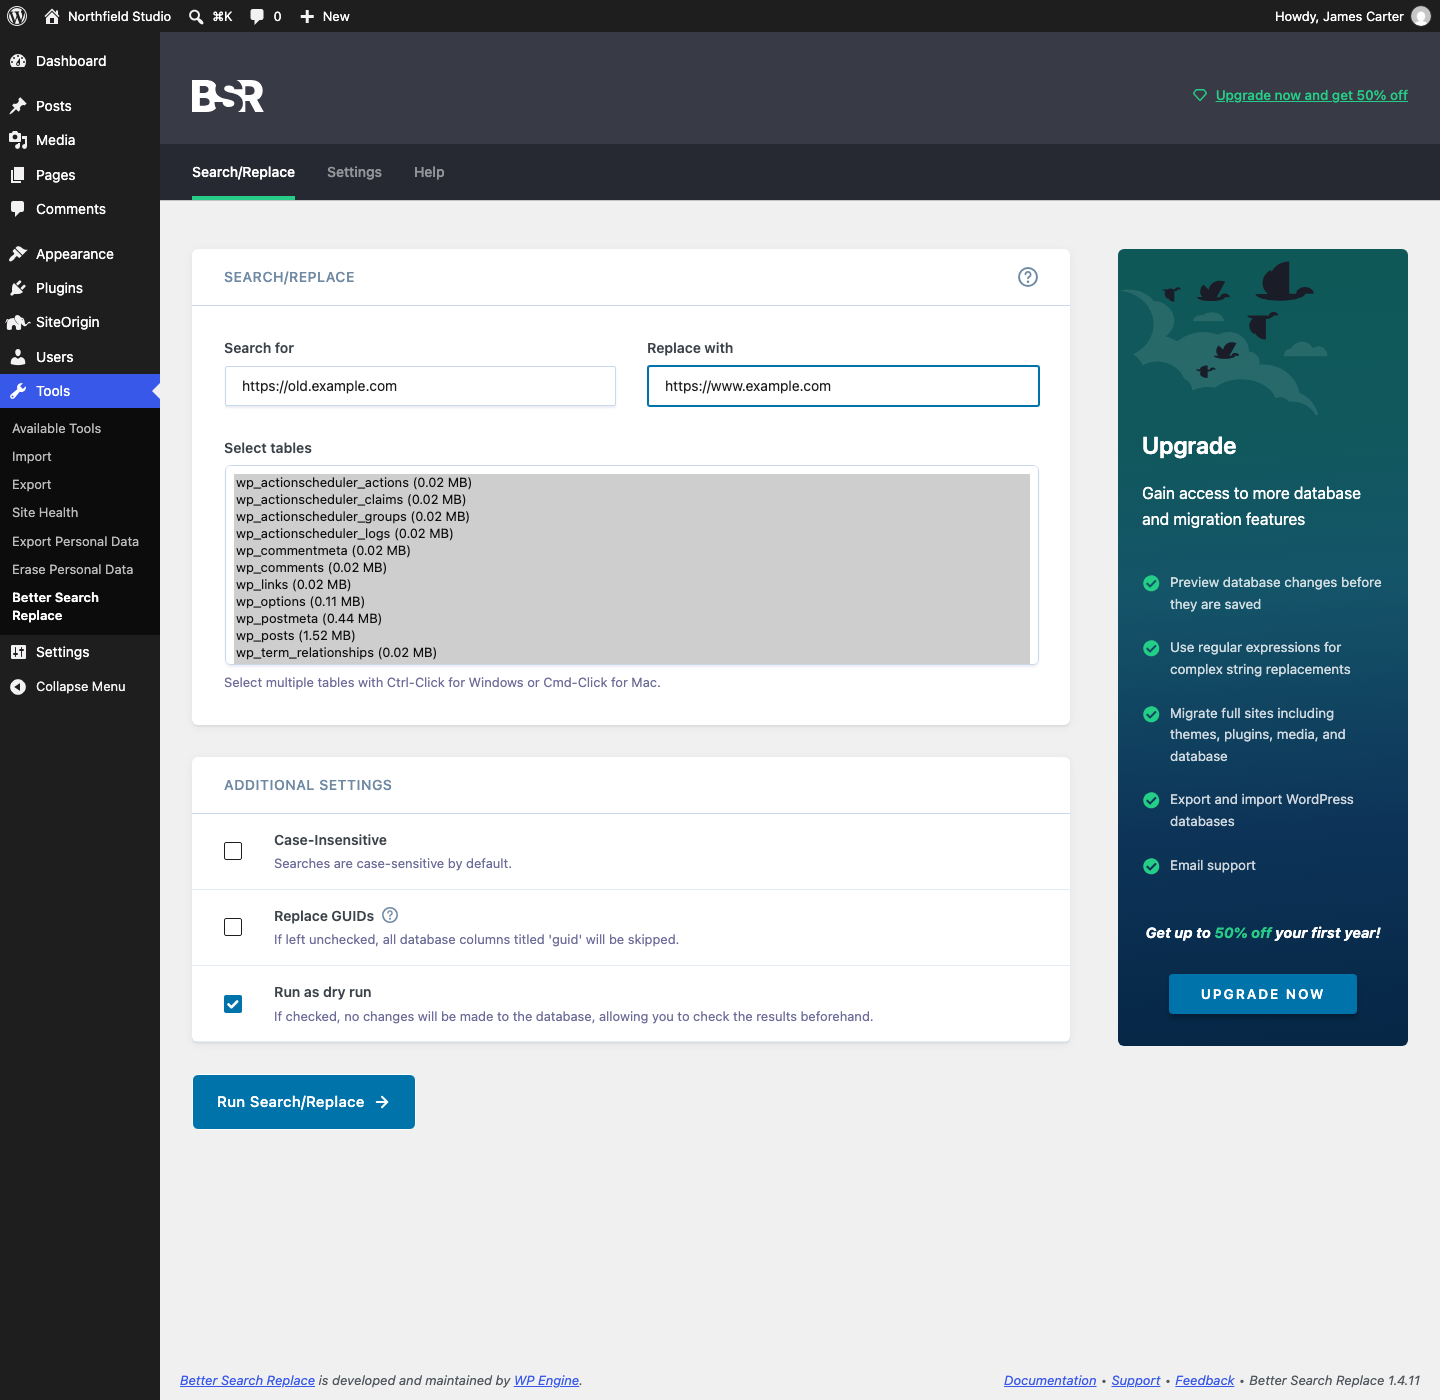
- In Search for, enter the site’s public address from before the move, as shown in Site Address (URL) on the old site, including
https://orhttp://, such ashttps://old.example.com. In Replace with, enter the new address, such ashttps://www.example.com. Leave off the closing slash in both. - In Select tables, select each table that starts with your site’s table prefix,
wp_by default. The prefix is the$table_prefixvalue inwp-config.php. Hold Ctrl on Windows or Cmd on a Mac and click each table. If the database holds another site, ask your host which tables belong to yours. - Leave Replace GUIDs disabled and Run as dry run enabled, then click Run Search/Replace. The dry run counts the changes without making them.
- If the dry run found the old address, disable Run as dry run and click Run Search/Replace again. If it found nothing, check the old address and its
http://orhttps://prefix.
If links still use another version of the old address, such as http://old.example.com instead of https://old.example.com, repeat the replacement for each old address you find. If the WordPress Address (URL) needs a change the first replacement didn’t make, such as a different domain or folder, run a second replacement for it. When you finish, deactivate and delete the plugin.
If you or your host use WP-CLI, the search-replace command also handles serialized data. The command below reports how many replacements it would make, including in plugin tables that use your table prefix. Replace both example addresses with yours, run it, then run it again without --dry-run.
wp search-replace 'https://old.example.com' 'https://www.example.com' --all-tables-with-prefix --skip-columns=guid --dry-run
After the Move
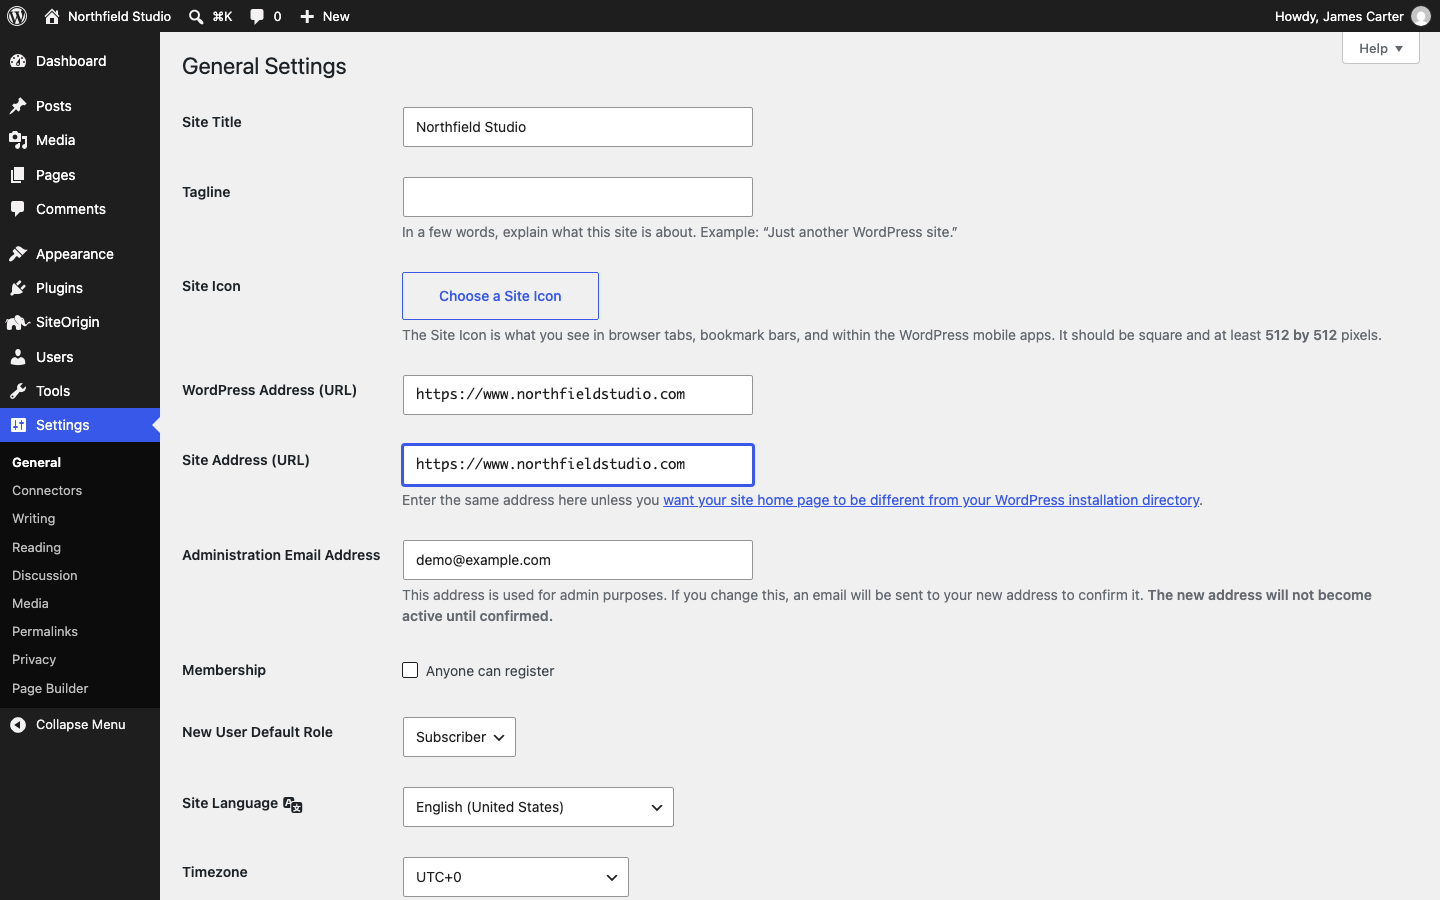
- Go to SettingsGeneral and check that WordPress Address (URL) and Site Address (URL) show the addresses you expect. If you kept the domain and the same WordPress folder, each should match its value on the old site.
- Go to SettingsPermalinks and click Save Changes. Saving this screen refreshes WordPress’s link settings, which fixes “Page not found” errors caused by the move.
- Go to SettingsReading. If this is now your live site, make sure Discourage search engines from indexing this site is disabled.
- Open the site with
https://and check for a browser warning. If you see one, ask your new host to check the SSL certificate. - Clear your site’s cache and ask your host to clear theirs. If you use a CDN, clear its cache too. Clearing Caches When Changes Don’t Show covers each cache.
- While logged out, check that your main pages display correctly, and test your menus and forms.
Site Not Working After a Move
- “Error establishing a database connection”: compare
DB_NAME,DB_USER,DB_PASSWORDandDB_HOSTinwp-config.phpwith the details from your host. If they match, ask your host to check the database server. - Only the homepage loads, and other pages show “Page not found”: save your permalinks at SettingsPermalinks. If the pages still don’t load, see Fixing Page Not Found Errors.
- The site sends you to the old address: add the
WP_HOMEandWP_SITEURLlines shown above, then replace the old address in the database. - The login page keeps reloading: clear your browser’s cookies for the site and log in again. If it still reloads, ask your host to check the site’s address and redirect settings.
- Images or links still point to the old domain: copy the old domain from an affected link, with its
http://orhttps://, and replace that address throughout the database. If an image is still missing after that, check that thewp-content/uploadsfolder was copied. - Page Builder layouts are empty, or widgets and Customizer settings are back to their defaults: first check that the same theme and plugins are active as on the old site. If they are, a plain find and replace is the cause: when the new address has a different length from the old one, it breaks the serialized data. Ask your host to save the current database, restore the database you had before the replacement, then replace the address again with a tool that handles serialized data.
- A blank page or “There has been a critical error on this website”: PHP stopped with an error while loading WordPress. After a move, check first for a theme or plugin that doesn’t support the new host’s PHP version. Debugging in WordPress shows how to find the error.
If a SiteOrigin plugin or theme still doesn’t work after these checks, follow Identifying Plugin Issues to find a conflict, then share what you found on the support forum.