
 Page Builder
 Widgets Bundle
 SiteOrigin CSS
 Installer
How to Create an Event Landing Page in WordPress
The Landing Page Addon in SiteOrigin Premium displays a page without your theme's header, footer or sidebars. Its Design settings let you give the page its own background, fonts and spacing.
In this walkthrough, we'll build a registration page for a one-day printmaking workshop, with the event details, an instructor introduction and a registration form. The page will be for Stillleaf Print Studio, an example printmaking studio in Lewes, Delaware, whose site uses Corp. We'll assemble the content with Page Builder by SiteOrigin, then use the addon to remove the surrounding theme layout and style the page.
Build the Registration Page
We'll start by creating the workshop page. For this example, you'll need Page Builder, the SiteOrigin Widgets Bundle and SiteOrigin Premium installed and activated. Activate the Landing Page Addon at SiteOriginPremium Addons.
Next, go to PagesAdd New in the WordPress menu and enter Botanical Printmaking Workshop as the page title.
- In the Classic Editor, click the Page Builder tab above the editor.
- In the Block Editor, open the block inserter and search for SiteOrigin Layout. Click the block to add it to the page.
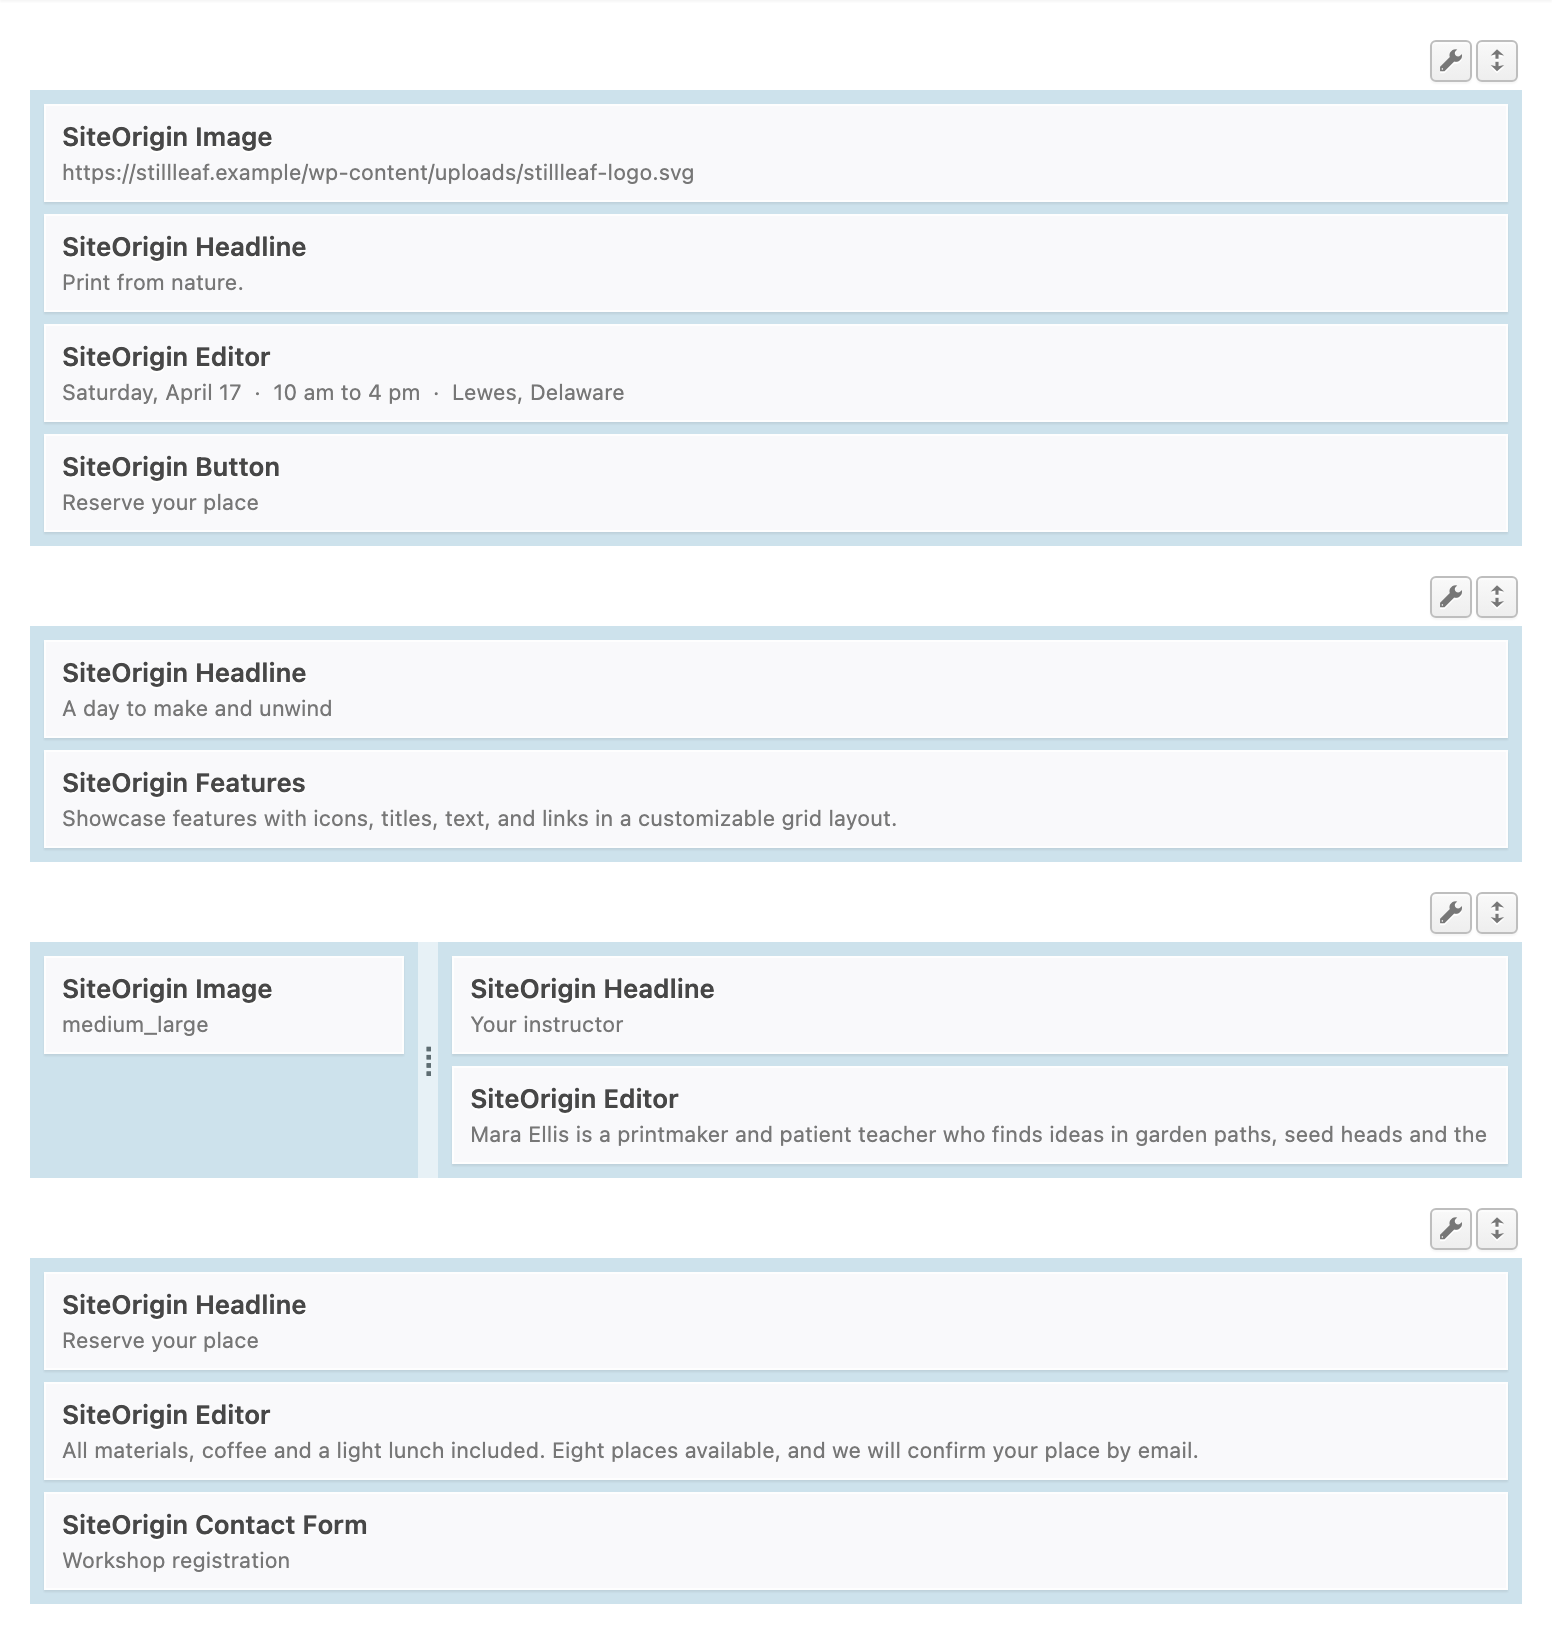
In either editor, we'll build the page with four rows, one for each section:
We'll divide the page into four sections, each in its own Page Builder row:
- Hero: the studio logo, a Headline Widget for the workshop name, the date and location, and a Button Widget. Use the workshop photo as the row background.
- What You'll Learn: a section heading and a Features Widget with three learning points.
- Your Instructor: an instructor photo and a two-sentence introduction.
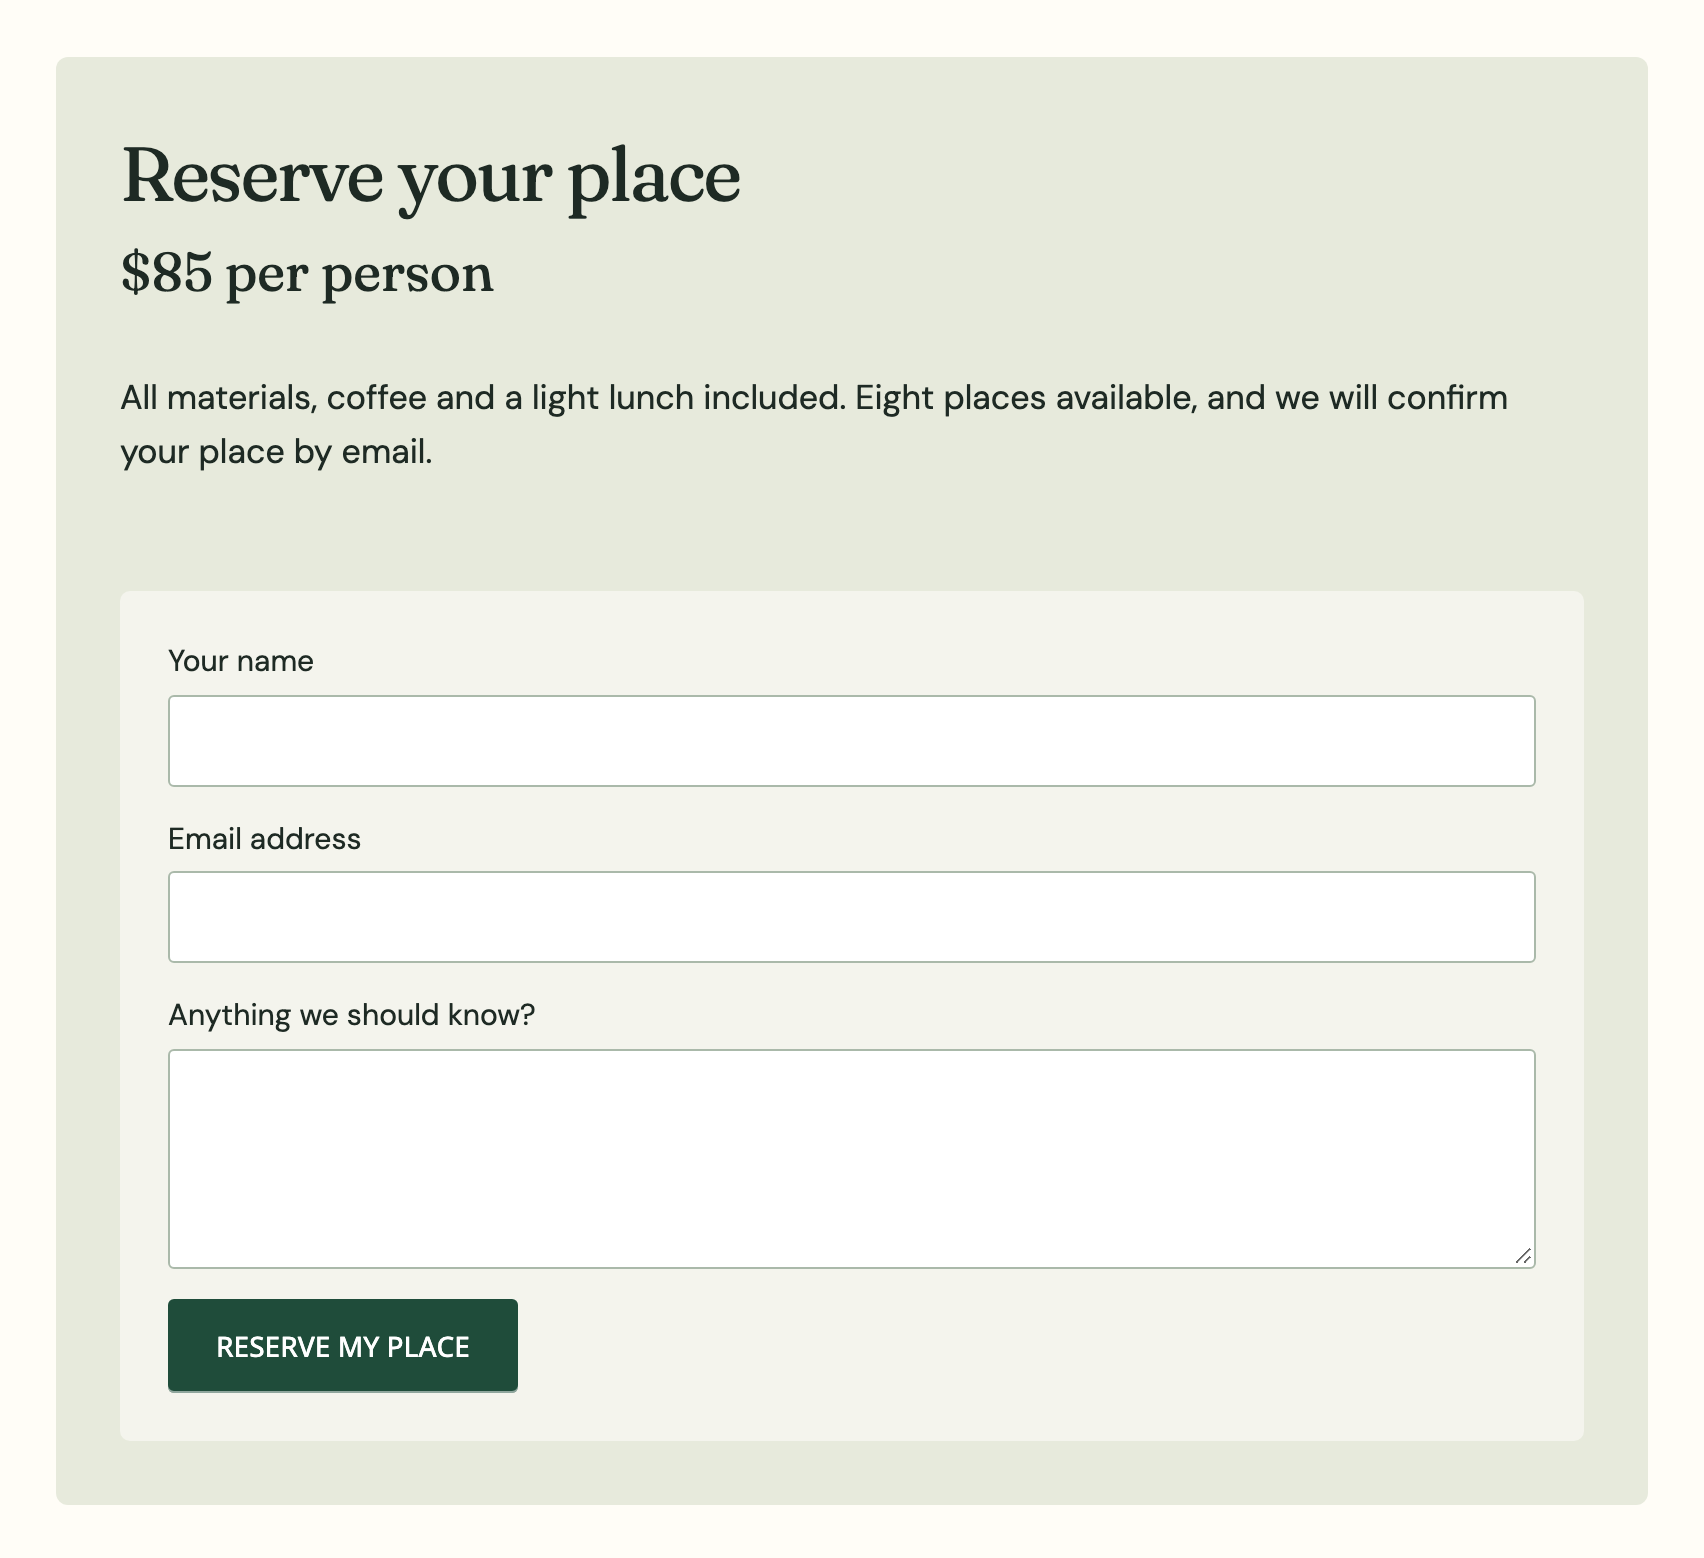
- Register: the workshop price and a Contact Form Widget. If you take registrations through a ticket service, use a Button Widget linking to the ticket page instead.
For each section, click Add Row in the Page Builder toolbar. Set Column Count to the number of columns you want in that row, then click Insert. A single column stacks the widgets vertically; two columns let you place content side by side, such as the instructor's photo and introduction.
To fill a row, select the column where you want the content and click Add Widget. Find the widget by name in Search Widgets, then click it to add it. Click the widget's name in the layout to edit its content. Use Done to return to the layout.
The workshop photo will sit behind the hero's text and button. Open the hero row's settings menu and choose Edit Row. In the Row Styles sidebar, open Design and choose the photo under Background Image. Click Done to return to the layout.
Add Botanical Printmaking Workshop to the Headline Widget in the hero row. This gives visitors a heading on the page itself; the page title you entered in WordPress appears in the browser tab.
Link the Hero Button to the Form
With the content arranged, we can connect the button at the top of the page to the registration form farther down. A visitor who is ready to register can then click the button to jump straight to the form.
The button needs a destination within the page. We'll give the Register row an ID, a unique name that a link can point to. The button's link will use the same name with a # in front, which tells the browser to look for that destination on the current page.
First, we'll name the destination. Open the Register row's settings menu in Page Builder and choose Edit Row. In the Row Styles sidebar, open Attributes. Enter reserve in Row ID, without a #. Click Done to return to the layout.
Now that the Register row has an ID, we can link the hero button to it. Open the Button Widget in the hero row. Enter #reserve in Destination URL. Click Done, then save the page with Save Draft.
Turn On the Landing Page
We've built the workshop page and linked the hero button to the form. Next, we'll use the addon to display the content without Corp's header, footer or sidebars, removing the surrounding navigation links.
In the page editor, find the SiteOrigin Premium metabox below the content. Open Landing Page and enable Enable Landing Page. Click Save Draft to keep the change.
Click Preview to check the result. The workshop content now appears without the theme's header, footer or sidebars. The page keeps the same address when you enable or disable the landing page setting.
Before we move on to the design, let's check that visitors can reach the form and submit it. Click the hero button to confirm that it takes you to the Register row. Send a test registration and check that the email arrives.
The Contact Log Addon also lets you check the submission in WordPress. With the addon active, open SiteOriginContact Log and select the test message. Its Submitted from row shows the workshop page.
Corp also lets you hide its own header and footer using Header and Footer in the Page settings box. We're using the Landing Page Addon here for its design controls as well as its standalone layout; the addon works with any theme.
Style the Page
The page now displays on its own, and we've tested the registration form. Next, we'll give the workshop a dark green background with a warm off-white area for the content. Return to the page editor and open Design, below Enable Landing Page. We'll work through its four groups, starting with the background.
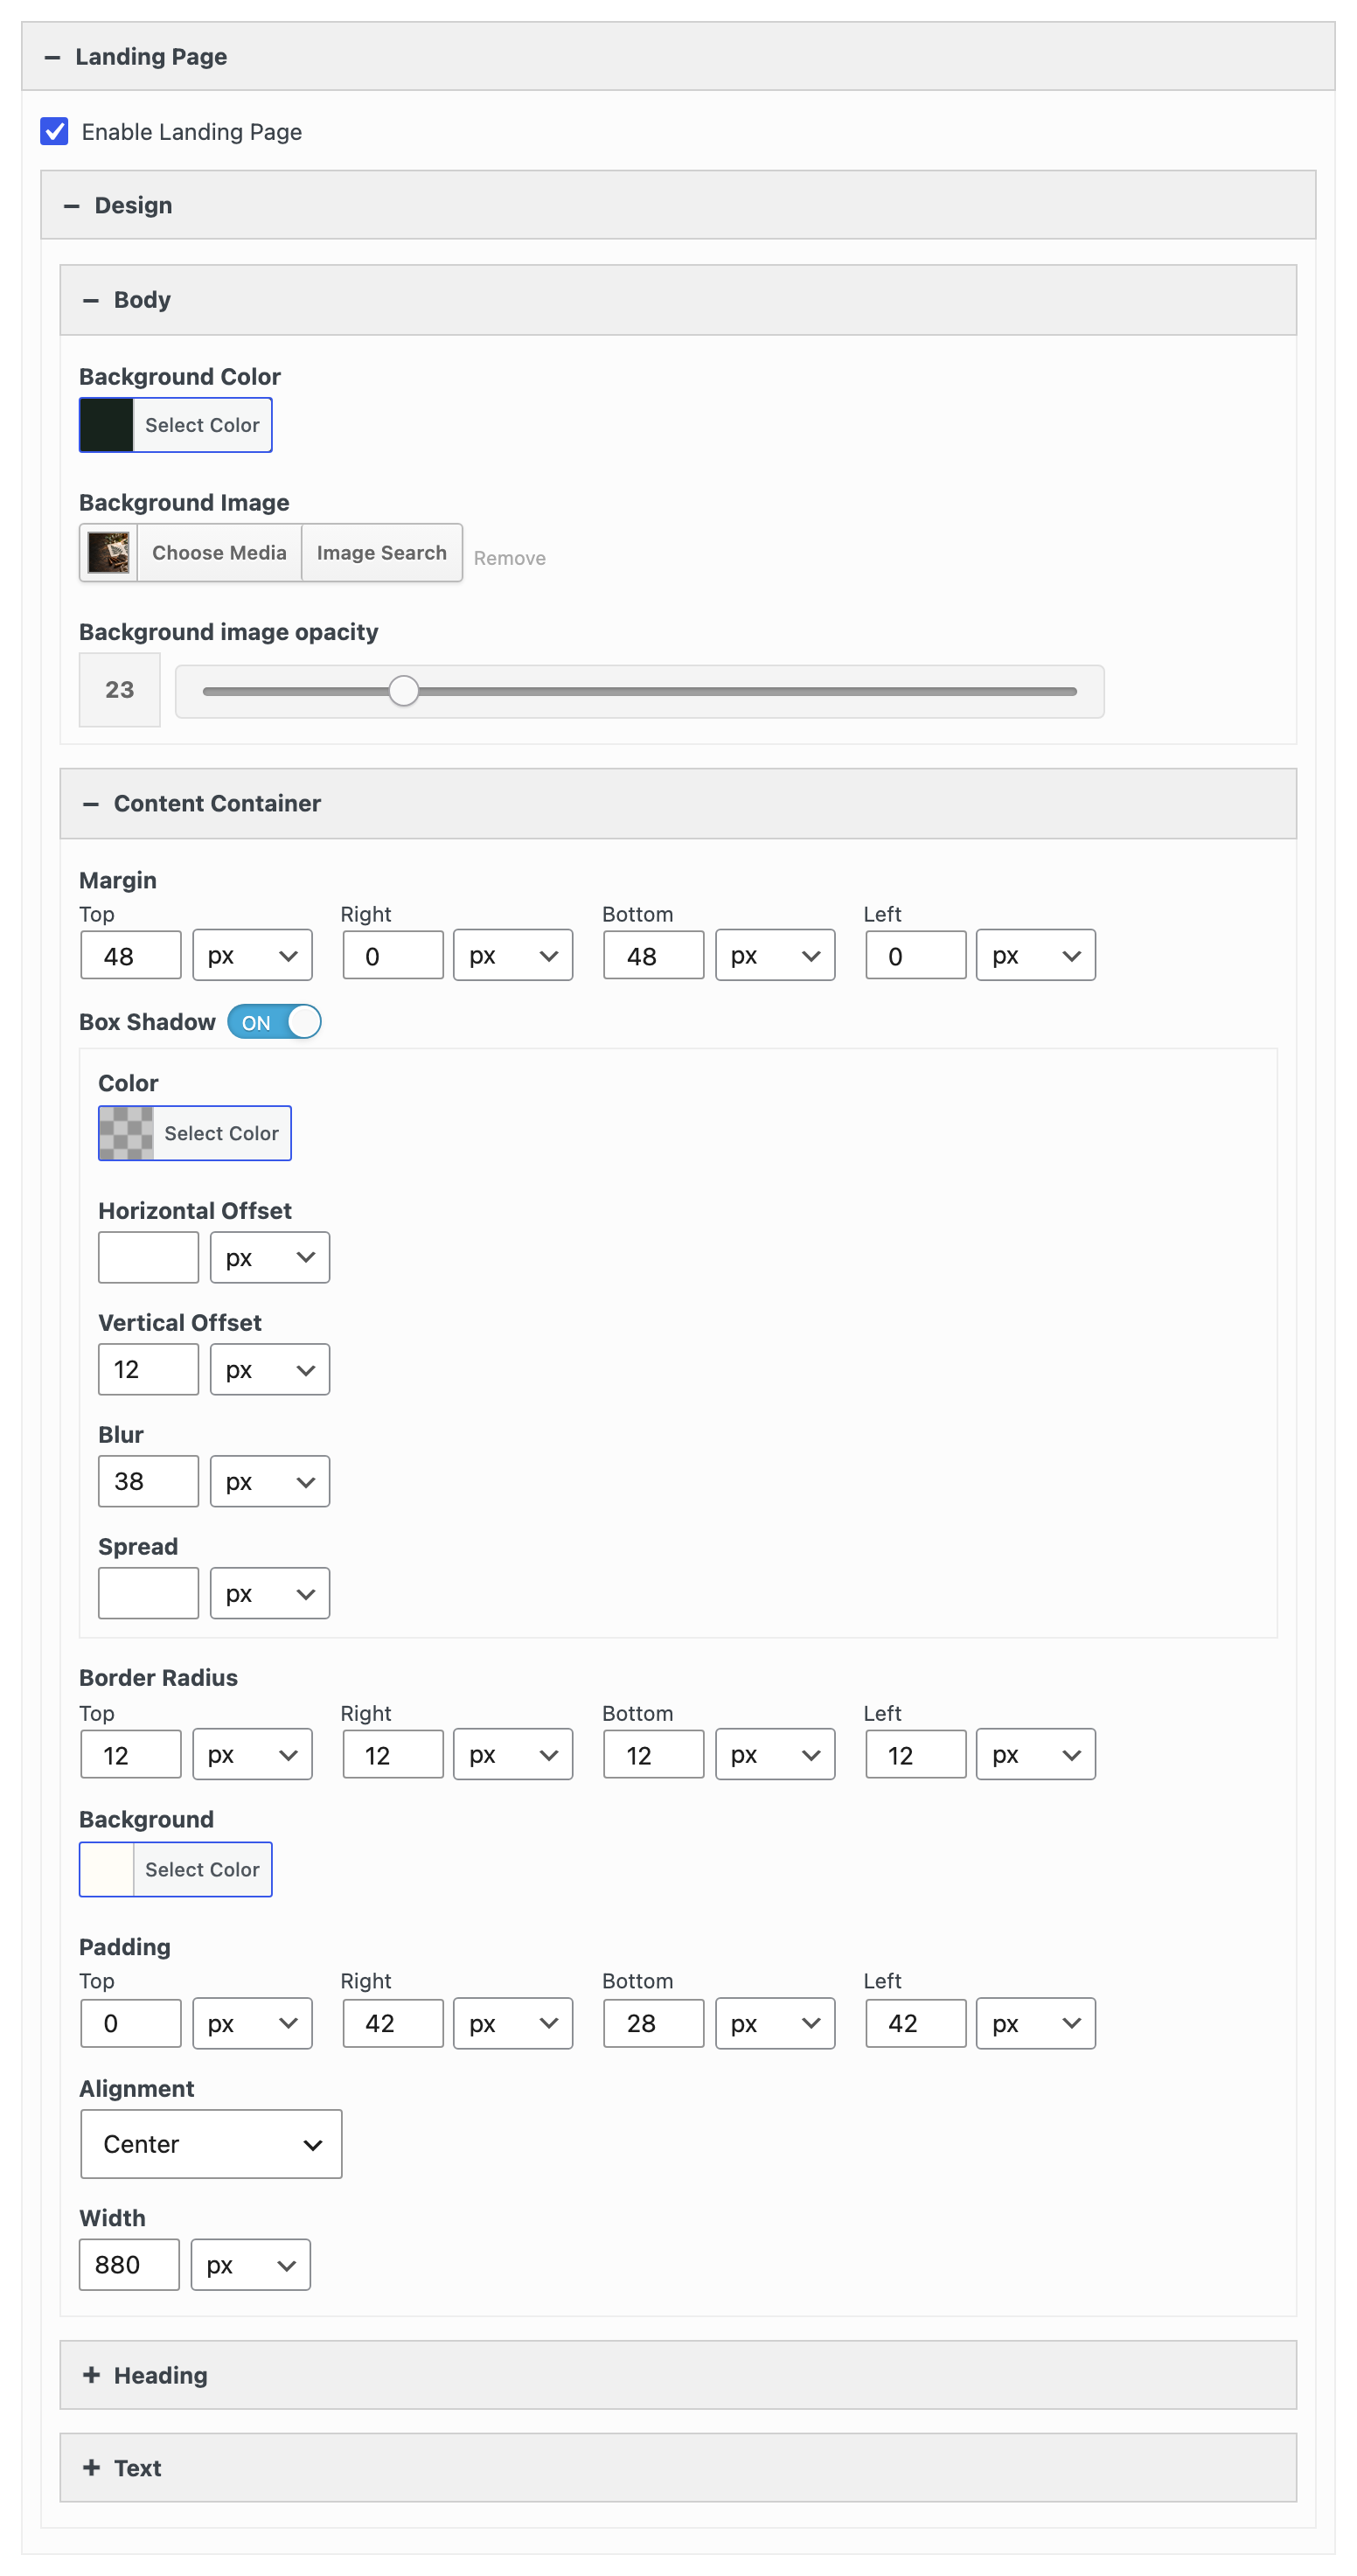
The background will be visible around the content. We'll use a botanical photo over a green base color, with the photo kept faint so the workshop details remain prominent. Open Body and use these settings:
- Background Color: deep forest green, #17231c.
- Background Image: a photo of botanical prints and carving tools.
- Background image opacity: 23. At 100, the photo appears at full strength; lower values let more of the green show through.
With the background in place, we'll style the area that holds our four rows. Open Content Container to set its width, background and spacing. Margin controls the space outside the container, while padding controls the space inside it. Use the following values for the workshop page:
- Width: 880px, with room for the three learning points side by side.
- Alignment: Center.
- Margin: 48px above and below the container.
- Background: warm off-white, #fffdf7.
- Padding: 42px on each side, 28px at the bottom and 0 at the top, so the hero reaches the container's top edge.
- Border Radius: 12px, to round the corners.
- Box Shadow: enabled.
Next, we'll set the page's fonts. Open Heading to choose the font, size and color used for every heading level. For the workshop page, use Fraunces at 38px in dark green.
That size also applies to the three feature titles, which we want smaller than the section headings. We can give the feature titles their own size in the Features Widget. Open the widget and go to Font Design > Title > Size. Set the size to 23px, then click Done to return to the page editor.
For the remaining text, return to the landing page's Design settings and open Text. Use DM Sans at 17px in the same dark green. This group also controls the link colors; we'll leave them at their defaults.
Click Save Draft to keep the design settings, then Preview to view the workshop page. The background now surrounds the off-white content container, with the workshop introduction at the top and the registration form below.
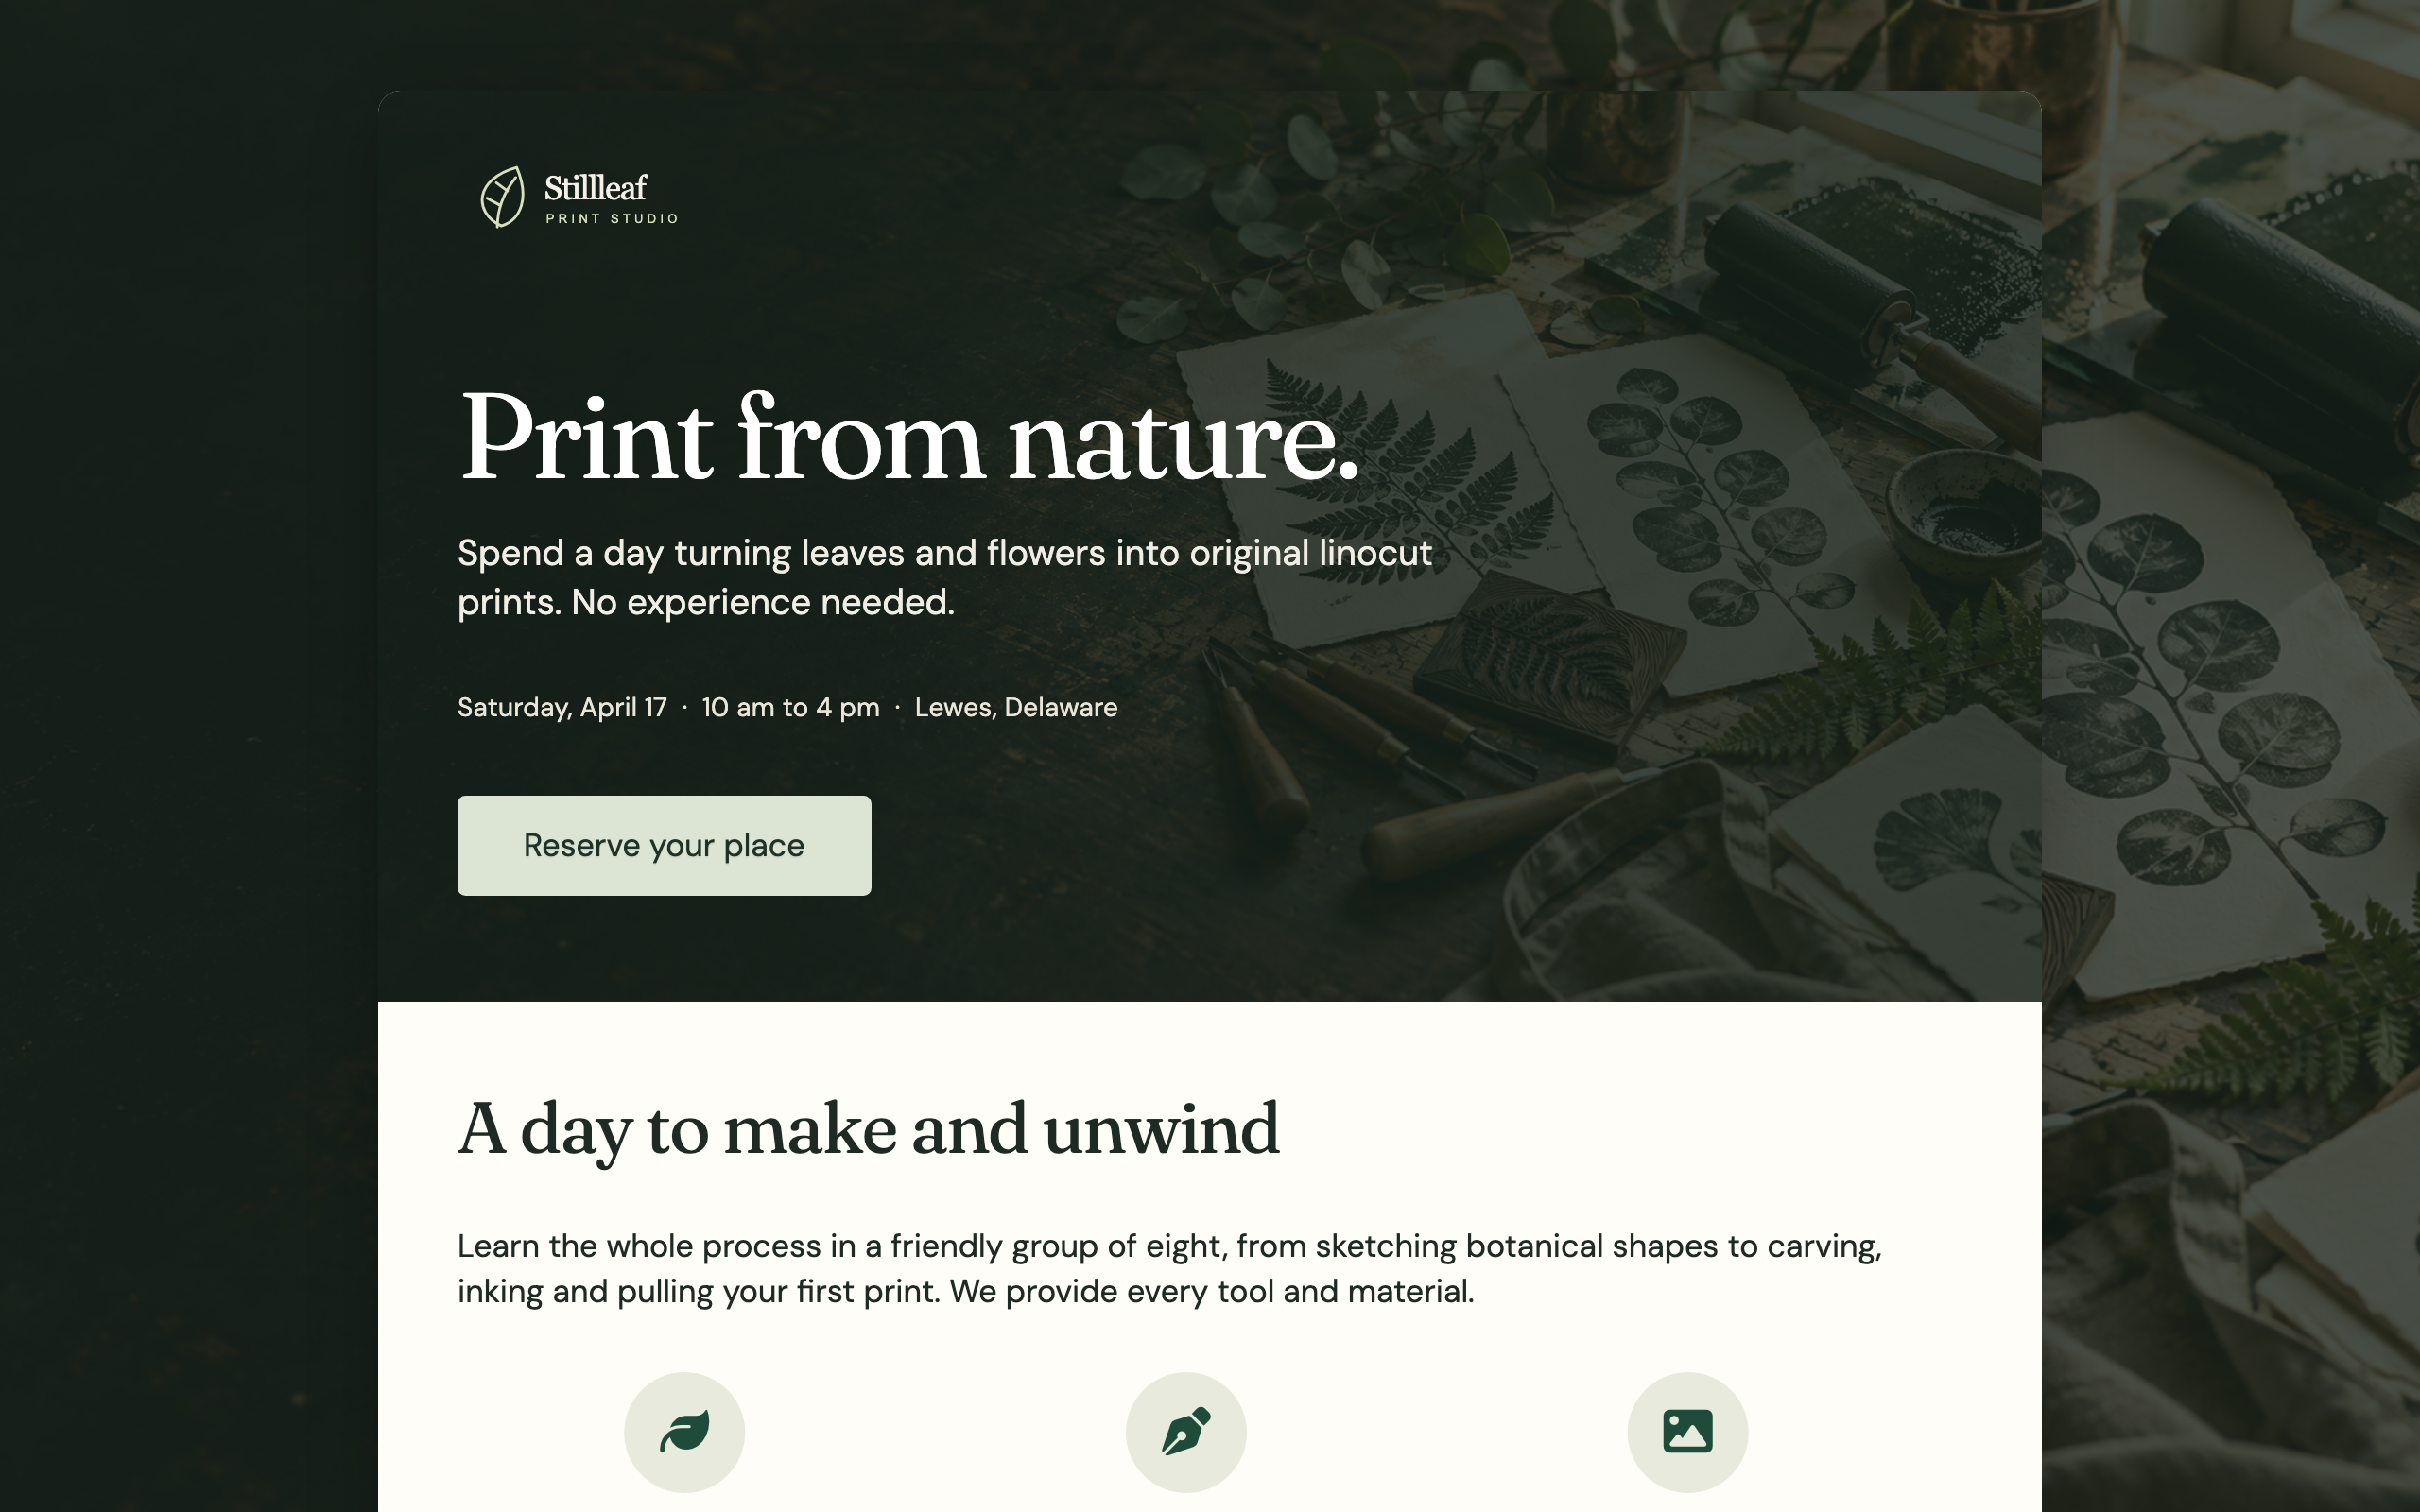
Once you've checked the design and received your test registration, click Publish. You can now share the page's address with people interested in the workshop.
When Registration Closes
The workshop page can stay online after registration closes, so visitors can still find the event details. Once all places are filled, replace the form with a "Sold out" message.
You can also return the page to your theme's usual layout. Open the Landing Page settings again and disable Enable Landing Page. Update the page to apply the theme's layout again.
For the next workshop, you can reuse the Page Builder layout. Save the layout with the Custom Layouts Addon, then use it as the starting point for the next event's content.
For more on the addon, see the Landing Page documentation. The Landing Page Addon is part of SiteOrigin Premium.
Thanks for reading. If you have questions or feedback, let us know in the comments.