Visual Editor
The visual editor is the heart of SiteOrigin CSS. Clicking on the eye icon ![]() will open the visual editor with a set of controls in the left column, this is ideal for most users. The expand icon
will open the visual editor with a set of controls in the left column, this is ideal for most users. The expand icon ![]() will open the visual code editor which is the same as the standard visual editor except the left column of controls are replaced by a code editor, this is ideal for more advanced users.
will open the visual code editor which is the same as the standard visual editor except the left column of controls are replaced by a code editor, this is ideal for more advanced users.
The following CSS definitions will be helpful in better understanding the documentation below. A CSS rule is made up of a selector and one or many declarations. Each declaration is made up of a property and a value.
Rule:
h1 {
	font-weight: bold;
}
Selector
h1
Declaration
font-weight: bold;
Property
font-weight
Value
bold
Visual Editor Page Layout
The page layout is made of the following:
Right column visual inspector and code inspector
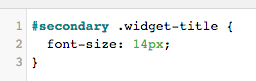
In the right column, you’ll find the visual inspector and below that the code inspector. You’ll begin in the visual inspector, start by clicking an element you’d like to edit. You’ll notice that the element will be outlined and highlighted. Below, you’ll see the code inspector is split into two columns, on the left, you’ll find the CSS rule names that are applicable to the element selected and on the right, you’ll see the corresponding CSS declarations.
The Recent Posts heading has been selected in the below example. In the bottom left we can see the CSS rules being applied to this element and in the bottom right we can see the CSS declarations that make up these rules.
If you’d like to leave the current page and navigate to another page within your website, click the magnifying glass icon ![]() to close the code editor. Once you’ve arrived at your chosen page, click the magnifying glass icon to reopen the code editor.
to close the code editor. Once you’ve arrived at your chosen page, click the magnifying glass icon to reopen the code editor.
Left column declaration controls
The left column starts with a drop-down menu that contains the CSS selectors currently highlighted. In the case of our Recent Posts example, the drop-down contains the following selectors:
#secondary .widget-title
.widget-title
h2
*
They’re listed in order of specificity, the most specific rule is listed first and the most general rule is listed last. The drop-down can be used to change the selector being edited and is suited to users with a basic understanding of CSS. For users new to CSS, this setting can be ignored for now. The tick icon to the right ![]() is used to close the visual editor and exit back to AppearanceCustom CSS.
is used to close the visual editor and exit back to AppearanceCustom CSS.
Below are three section headings, Text, Decoration, and Layout. The settings contained in each section are used to edit the element you’ve highlighted within your page. For example, if you’d like to change the font size of the Recent Posts heading we previously highlighted you’d use the Font Size setting and enter a px size value as seen below, the change will immediately appear in the visual inspector to the right.
![]()
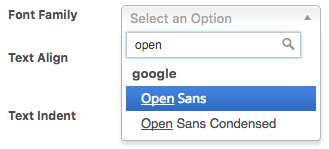
SiteOrigin CSS provides a Font Family field. This field can be used to manually insert the font-family value of your choice. If you’d prefer a drop-down list of Google Web Fonts to choose from, consider SiteOrigin Premium which includes a Web Font Selector addon for SiteOrigin CSS.
Once done, click the tick icon ![]() and you’ll be returned to AppearanceCustom CSS which will contain the code created by your edit within the visual editor.
and you’ll be returned to AppearanceCustom CSS which will contain the code created by your edit within the visual editor.
If no further changes are required, scroll down and click Save CSS.
Visual code editor page layout
The page layout is made of the following:
Right column visual inspector and code inspector
The right column visual and code inspector is unchanged from the standard visual editor mode. Select the element you want to edit and then check the code inspector at the bottom of the page to view the CSS selectors and declarations being applied to the element you’ve selected.
Left column code editor
The left column previously filled with declaration controls is now replaced with a code editor. To get started, click the element you’d like to edit in the visual inspector, next, scroll down to the code inspector and click the selector name you’d like to make additions to. You’ll notice the selector name is inserted into the left column code editor, ready for you to make additions. If you start in the code editor first and type in a selector name that exists on the page it will be highlighted in the visual inspector.
If you’d like to quickly insert existing declarations, click your mouse cursor within the braces of a rule and then click on a declaration in the right column of the code inspector, the declaration will be inserted into the code editor.
Once done, click the expand icon ![]() to return to AppearanceCustom CSS and click Save CSS.
to return to AppearanceCustom CSS and click Save CSS.