Adding a Form to a Hero Image

Adding a form to your hero image is a great way to turn user attention into action. In this tutorial, we’ll cover how to use Page Builder by SiteOrigin and the SiteOrigin Widgets Bundle to add a hero image (using the Layout Slider widget) and a contact form to your page.
Required Plugins
Page Builder by SiteOrigin
SiteOrigin Widgets Bundle
Once Page Builder and the Widgets Bundle are activated, go to PluginsSiteOrigin Widgets and make sure that the Layout Slider, Headline and Contact Form widgets are activated.
Getting Started
Go to Pages and edit the page you’d like to insert your hero into. If you haven’t activated Page Builder on this page yet, click on the Page Builder tab and then in the Page Builder toolbar, click the Add Row button and add a single column row to your page. While editing the row, click the Layout tab on the right and set the Row Layout to Full Width Stretched.
Next, select the row you’ve just created and click the Add Widget button. Because we need a Layout Builder within our hero we’re going to use the SiteOrigin Layout Slider widget. After clicking Add Widget, use the search bar at the top left to search for the SiteOrigin Layout Slider widget and insert it.

Setting up the Layout Slider
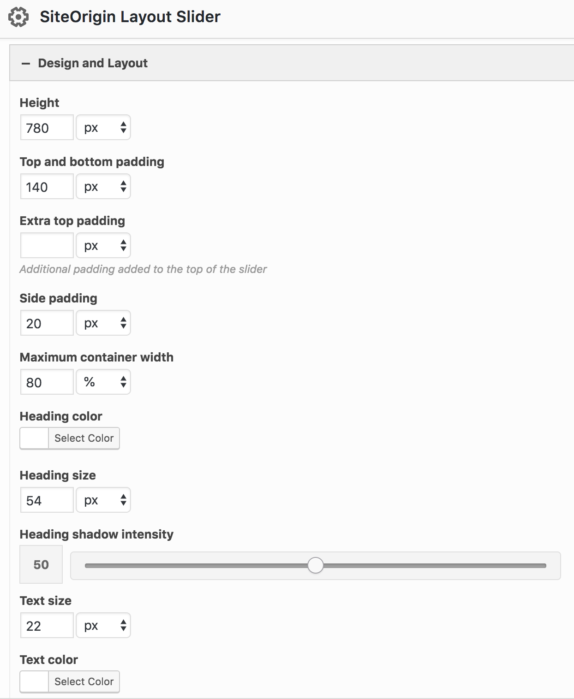
Click on the SiteOrigin Layout Slider widget and then the edit link to open it. Before adding a frame, click on the Design and Layout tab to enter a few basic setup settings. For our demo, we’ve used the following:
Height: 780px
Top and bottom padding: 140px
Extra top padding: Not populated
Side padding: 20px
Maximum container Width: 80%
Heading color: #fff
Heading size: 54px
Heading shadow intensity: 50
Text size: 22px
Text color: #fff
Adding a Frame and Contents
As with all SiteOrigin slider widgets, multiple frames (slides) can be added. In this example, we’ll just be adding a single frame. Click the Add link in the Slider Frames section to add a frame. Start out by opening the Background section and adding a background image. In our demo we’ve used:
Background image type: Cover
Background image opacity: 20
Background color: #000
Our demo background images were sourced from Unsplash.
With our frame background added, it’s time to add a headline and contact form. Click the Open Builder button, this will open a mini-instance of Page Builder. To set up your content, follow these steps:
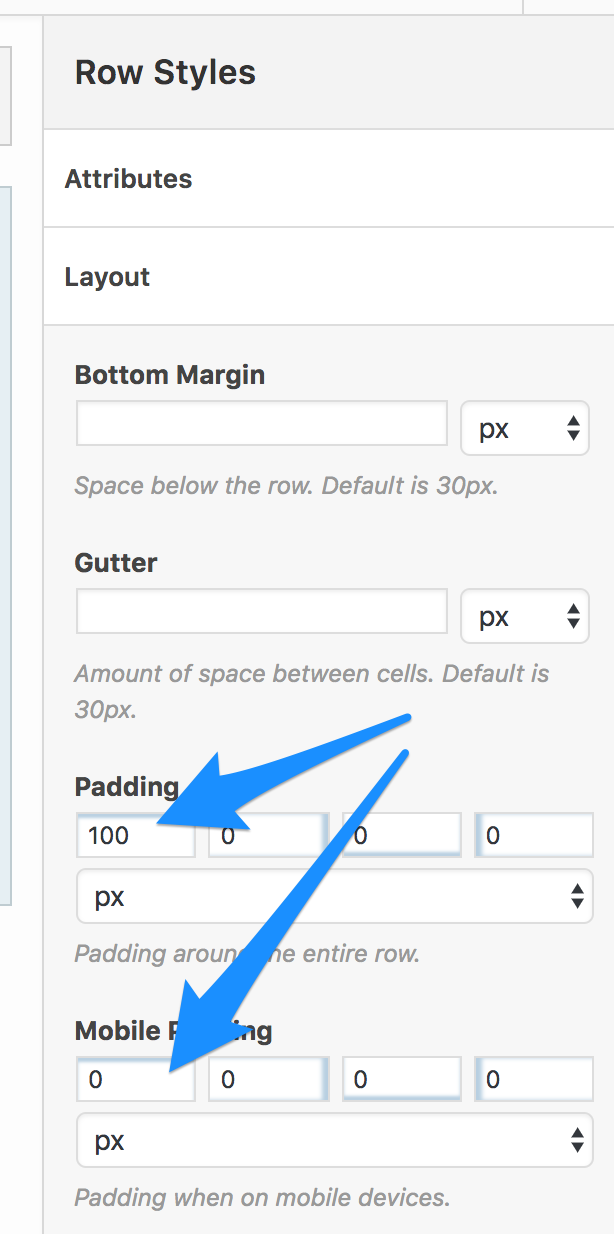
1. Click the Add Row button. For our demo we added a single row with two columns. Click and drag the column divider to change the widths. We’ve used 60% for the left column and 40% for the right. While editing the row, click the Layout tab on the right and set 100 for the top padding and 0 for right, bottom and left. Set Mobile Padding to 0.
2. Insert your widgets. Click on the left cell, then click the Add Widget button, use the search form at the top left to search for the SiteOrigin Headline widget. Repeat the same process for the right cell and insert the SiteOrigin Contact Form widget.
3. Edit the Headline widget. Open the Headline section and insert your headline text, we’ve used H1 for the headline HTML tag. For SEO your page should only contain one H1 tag. If you’re using a H1 tag anywhere else on your page then it’s best to make this H2 or H3 depending on your content structure. Next, open the Sub headline section and insert your sub headline. We’ve used Paragraph for the HTML tag. Finally, open the Divider section. We’ve set the Style setting None as we aren’t using the divider in this example. Click Done to save your changes.
4. Edit the Contact Form widget. The Contact Form widget is quite settings rich so it might take a few moments to set up.
Open the Settings section to set up your form basics such as email addresses, subject, success message and send button text.
Add form fields as required. In our example, we’ve used a text field for name and an email address field.
Open the Design section and style your form as required. In our demo, we’ve set the ContainerBackground color setting to be blank, we’ve removed the color value so that no background color is set. This is an important setting to ensure our form has a transparent background. We’ve also set the Container padding to 0px and the Border style to None.
In the Field Labels section, set the Position to Inside.
In the Fields section, we’ve set the Font Size value to 18px, we’ve left the Background setting blank and set the Border color to #c0c0c0. We’ve set the Border width to 1px and Border style to Solid.
In the Submit button section, we’ve enabled the Style submit button setting, used Font size 18px. We’ve set the Align to Left.
Once complete, click Done to save the Contact Form widget and then Done again to save the Layout Builder, lastly, click Done to save and exit the Layout Slider widget and then publish or update your page.

Enhanced by SiteOrigin Premium
SiteOrigin Premium is a plugin that adds additional settings and functionality to SiteOrigin widgets, Page Builder and SiteOrign themes. It also includes our quick and helpful email support service. The following SiteOrigin Premium addons could be applied to engage users and provide additional functionality:
Block Animations
The Block Animations addon offers animation settings for rows and widgets. We’ve created a demo showing a simple widget contents fade in with a slight delay. Read more about the settings available in the SiteOrigin Premium Block Animations addon it the documentation.
Parallax Sliders
The Parallax Sliders addon offers parallax scrolling for the SiteOrigin Slider, Hero, and Layout Slider widget. We’ve created a demo showing the Layout Slider with a parallax scrolling effect. Read more about the settings available in the SiteOrigin Premium Parallax Sliders addon it the documentation.
Autoresponder
The SiteOrigin Premium Contact Form addon provides an autoresponder. Let users know you’ve received their email and provide a timeframe for response. Read more about the settings available in the SiteOrigin Contact Form addon in the documentation.
Using the Demo Layout
View the demo.
Download the demo layout (JSON file) (Right click > Save As).
If you’d like to make use of the demo layout, follow these steps:
1. Download the above JSON file to your desktop.
2. Go to the page you’d like to use, if you haven’t activated Page Builder on this page yet, click on the Page Builder tab and then in the Page Builder toolbar, click LayoutsImport/Export.
3. Upload the layout either by dragging and dropping or selecting it using the select button.
4. Finally, click the Insert button bottom right.
If you have any questions or comments, please let us know below, we’d love to hear from you.
33 Comments
Thanks guys, nice tutorial. I have two projects where I thought about something like this. Very useful and timely.
Hi Dave :) Great to hear from you. Thanks for reading. Let us know if any questions arise. Cheers!
Thank you for the visual demonstration. All clearly and graphically.
But there is a question:
How and where the transparency function of the feedback form is included. I can not find. And still it is not possible to combine to combine a background, the text and the form in a single whole (as at you).
Even after downloading your demo. Only the adjusted background is displayed (size,
transparency, etc.) But there is no text and no form.
What am I doing wrong? Thank you if you explain.
Hi Sam, thanks for reaching out. We can answer short questions here but more complete questions like yours, we ideally need to assist on the forum. Please, open a thread here: https://siteorigin.com/thread and include a link to the page you’re working on. We’ll take a look. Thanks. (If you’re using SiteOrigin Premium, please email us for help.)
Hi Sam, have you had a moment to open a support thread on the forum?
Hello,
I’m having the same issue. Done everything as suggested in the tutorial, several times in fact. But all I have is the background image when I preview the completed page. When I preview it within the Page Builder, then I just get one column, it seems to ignore the 2 columns. Help. Many thanks
Hi Ali. How about when you save and view the page? If that doesn’t help, have you tried using the prebuilt layout provided in the tutorial as a starting point? If that also doesn’t help, please, open a support thread on the forum so we can assist further. Please, include a link to the page you’re working on. The forum is here: https://siteorigin.com/thread. If you open a thread then consider switching to another task until we’ve had a chance to take a look, that way you might save a little time :)
Hi Ali :) Have you made progress?
Hi Andrew: will this (or something similar) work to display text inside a photo? i.e., without a slider [but a full-width hero image] and without a form?
I have been trying other site-builders and none allow me to place words over images then position the words anywhere in or out of the photo’s location on the web-page.
Also, is there a way to “demo” your Page Builder without WordPress installed? I am trying to choose a site-builder before getting bogged down with my first install of WordPress. I already have a host.
Thanks so much.
Hi Lance, thanks for posting. Please, see our Hero overview video here: Page: Hero. You can use the Hero to place text over an image. You could move the text location using the Hero padding settings. There, unfortunately, isn’t an online demo for Page Builder by SiteOrigin. It’s a free plugin so you can install it and the SiteOrigin Widgets Bundle once you have WordPress installed. A lot of hosts offer one-click WordPress install so it might be quicker than you think to test. Good luck with your research :)
From WilliamHoilt withlove))
Hi William :) Thanks for reading. All the best.
Sir, I am getting an on home page after upgrading wordpress 5.2.
Hi, please open a support thread on the forum: https://siteorigin.com/thread. Thanks.
Thanks for the simple and practical tutorials. Keep up the good work!
Hi Hans :) Thanks for commenting, glad to hear the post helped. All the best.
Great tutorial, until setting up the contact form. Now I have huge default contact form white box instead of the couple of text box in your sample with partial transparent background photo. Kinda wish you continued the contact form setup, so we can learn how to replicate this and learn about the features.
Been using siteorigin over a year, on the premium plan, but still don’t know the benefits. For this tutorial, possibly showcase the premium features by additional tutorial using the parallax, autoresponder, and implementing block animations? Listing it doesn’t show us how powerful siteorigin is.
Alot of us love siteorigin, but also confuse as to the benefits and settings for each.
Hi Erik, thanks for your feedback. Sorry to hear you ran into trouble with the form, please send premium support an email on [email protected] with a link to the page concerned. We can help complete the setup by resolving the form background and anything else you need a hand with. Thanks again :)
To find out more about the premium addons that are applicable to this layout, please see the documentation pages for each addon:
Block Animations addon documentation
Parallax Sliders addon
Contact Form addon – Autoresponder
Hi Erik, a quick follow-up. I’ve emailed to let you know we’re available if you need a hand. The form white background can be removed by editing the Contact Form widget and opening the Design section. Within the Container sub-section, you can set the Background color setting to transparent by removing the color value. That’ll ensure your form has a transparent background.
Nice guide. Thanks for the depth tutorial. keep up the good works.
Thanks for reading :)
Hello, thanks for the tutorial, really helpful for even me who has never built a website before. I followed all the steps, everything seems fine, the only thing is my header image isn’t the full width of the page like yours. It isn’t the resolution of image as I have tried different images with different pixel widths. It can only assume it is a setting. Please advise.
Many thanks :)
Hi Kamal, thanks for reading :) Is your Page Builder row set to Full Width Stretched? You can edit the row by clicking the wrench icon on the far right then Edit Row > Layout > Row Layout: Set to Full Width Stretched.
If the above doesn’t help, please send a link to the page and I’ll take a look :)
Hello again Andrew, was just about to leave a comment saying ignore my last message as I had worked it out, but I see you gave a quick response, so thank you for the great customer service :D
I noticed on your demo, that your navigation menu is in white is there a way to make the navigation menu transparent, so the background of the navigation menu is your headline image?
Hi Kamal, sorry I missed your reply, it got lost in my emails somehow. Our SiteOrigin Corp theme offers an overlap page setting. If you’re using Corp, you’ll find this in the Page Settings meta box on the right when editing a page. If your theme doesn’t offer this as a setting then it’s something that would need to be done with a little custom development.
Thank you so much for this awesome tutorial. Just one question how do I get the image and row to fit within the column of my home page. When I upload the template and keep it at stretched it fits the whole screen but if I just use full it is to small. What are the best settings to adjust to make it fit so it doesn’t overlap the sidebar. Thank you again.
Hi Tim, thanks for reading :) If you have a sidebar in place then you’ll need to edit the row, open the Layout section and set the Row Layout to Standard. Anything else, Full Width, Full Width Stretched or Full Width Stretched Padded will overlap your sidebar. If you send a link to your page, I can take a look and advise further. Thanks again.
Sir, I am getting an on home page after upgrading WordPress 6.1. pleas help me
Hi, thanks for reaching out. Kindly, post on the support forum and provide as much information about the issue as possible. You can find the forum at https://siteorigin.com/thread. Thanks.
hi sir, you’re really great your all post help me lots
Glad the post helped :) All the best with your website.
Very helpful post your this i will never forget
Glad it helped :)