Masonry Plugin Documentation
The first thing you need to do after downloading the Masonry Layout plugin is install it in your copy of WordPress. You’ll also probably need to regenerate your thumbnails.
There are 2 ways you can use the Masonry plugin. It gives you a widget and a shortcode. The widget is perfect if you’re using our Page Builder.
Setting Post Brick Size
By default, each post in your masonry layout occupies a brick with a width and height of 1. To give the layout a little more dimension you can change the brick size of each of your posts.
When you’re editing a post, you’ll see a Masonry Settings metabox.
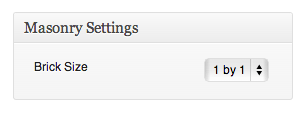
The size is given as width by height. It’s up to you to decide the size for each posts. In general it’s a good idea to give posts with panoramic featured images a 2 by 1 size and portrait images a 1 by 2 size. You can give important posts a 2 by 2 size and less important posts a 1 by 1 size.
The Widget
The Masonry plugin gives you a widget with a few simple options for choosing which posts you display. This is what the form looks like if you’re using it with Page Builder.
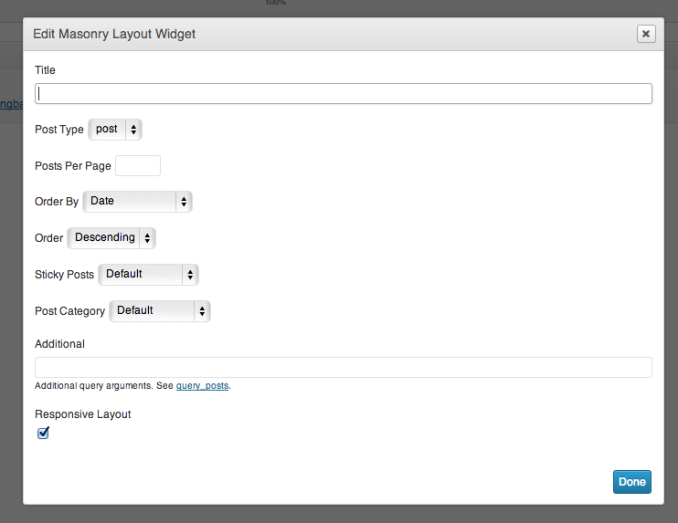
- Title
This is just a title for the block. Think of it as a standard widget title. - Post Type
Allows you to filter by post type. - Posts Per Page
Choose how many posts you want to display in the masonry block. - Order By and Order
Lets you choose ordering of the posts. - Sticky Posts
Lets you choose how you want to handle sticky posts. You could, for example, choose to only display sticky posts. - Post Category
If you’re displaying standard posts, you can choose which category to display in the block. - Additional
This gives you ultimate control. You can specify a query_posts query that chooses exactly which posts you display. - Responsive Layout
Do you want a responsive layout or not.
The Shortcode
The shortcode for the Masonry layout simply lets you specify the query in query_posts format.
[masonry query="..."]